The Gilroy Pizza

We are slowly starting to get the house into shape! We have TV but no internet yet. We will hopefully have it soon and then I will get back to posting regularly.

The other day Michael’s boss bought them Jake’s Pizza for lunch and he brought the leftovers home. There was one called the Gilory Special and it looked amazing. Ranch, mushrooms, sausage, chives and tons of garlic! I just had to make a healthier vegan version. I took off a few ingredients and used Annie’s Lite Goddess Dressing instead of ranch—and of course used vegan cheese and sausage.

For those of you not from Northern California (oh, it hurts my little Oregonian heart to say that I live here!) Gilroy is a city in southern Santa Clara County that is famous for its garlic crop. It grows other produce like mushrooms, artichokes and tomatoes—hence the name and toppings of the pizza.

The Gilroy Pizza
1 pre-baked pizza crust (try my recipe)
1/4 cup of creamy salad dressing (try a ranch or I used Annie’s Lite Goddess)
2-4 cloves of garlic minced, depending on taste
1/2 cup vegan mozzarella (I used Follow Your Heart)
1/2 cup sliced mushrooms
1/4 cup marinated artichoke hearts, chopped
1/4 of marinated red pepper, sliced
1/4 ground vegan sausage (I used Lightlife Gimme Lean Sausage)
Chives, chopped

Pre-heat the oven to 500 degrees.

Place the pre-baked pizza crust on pizza pan.

Spread the dressing over the crust.

Sprinkle on the garlic.

Cover with mozzarella.

Add the mushrooms, artichokes, and red peppers.

Crumble on the sausage.

Bake for 10 minutes, or until the heated through and the mushrooms are cooked. Once again, this is vegan cheese, it lacks casein so it will not get all bubbly. It will melt a little bit but will quickly burn if you leave it in too long.

Like my nifty 50s linoleum floor?

It’s creamy, it’s garlicky, and it’s full of veggies. What’s not to love!

Advertisement

Lentil Loaf

I must confess, I have a love for infomercials.  My new favorite is that meat loaf pan that supposed to make the perfect loaf every time.  I question if the thing works but it made me want a delicious lentil loaf.  Meat loaf was one of the few meat dishes I actually liked when I was growing up, so I was kind of skeptical to see if a lentil one would compare. And I was surprised that it did! Now I make them often. Savory, a litte “meaty” and if you make them right, they can even be a little juicy.

Lentils are a pulse (don’t worry, I had to look that up too) that is part of the legume family. Their seeds are little lens-shaped pods that are high in protein, vitamin B, and fiber. They were consumed by neolithic Middle Easterners as far back as 13,000 years ago. And, surprisingly Canada is the top producers of lentils today.

Now, don’t judge this dish until you try it. It does not taste like a big pile of bland beans at all. Cooked lentils have a slightly “meaty” texture, which is why I love to put them in pasta sauces to create a heartier dish. The key to making a good lentil loaf, just like a meat loaf, is getting the consistency right. Make sure there is enough liquid and gluten in the mixture so it will stick without being mushy.

Lentil Loaf
1 cup dried green lentils
1/2 tbs vegan butter
1 cup vegetable stock
1/2 white onion, finely chopped
1/2 cup breadcrumbs
1 cup cooked oatmeal
1 tps Italian seasoning
2 tbs tomato paste (or ketchup works just fine)
1 tbs soy sauce
Salt and pepper, to taste

Pick through the lentils and throw out the bad ones. Soak the lentils overnight.

Heat a skillet over medium heat and add the vegan butter.

Drain and rinse the lentils. Add to skillet. Cook until the lentils are slightly golden.

Add the vegetable stock and bring to a simmer. Cover and let cook until all the liquid is absorbed, about 40 minutes.

Pre-heat the oven to 400 degrees Fahrenheit. Spray a sheet pan with cooking spray (I didn’t use a loaf pan because I think it is a pain to remove the loaf in the end).

In a large bowl, add the cooked lentils, cooked oatmeal (it must be already cooked, it will help the load adhere together) and the onions. Mix together well. Mix in all remaining ingredients.

Shape into a loaf on the sheet pan. Feel free to top with ketchup like a meat loaf before you pop it in the oven if you like. Bake for 30 to 40 minutes, until the top is a little golden.

I ate mine with some steamed green beans and some ketchup. So delicious. It makes nice leftovers the next day too. I think I will make a simple gravy for it tomorrow night, and maybe some mashed sweet potatoes.

Here Comes Summer: Brats, Fries and Coleslaw

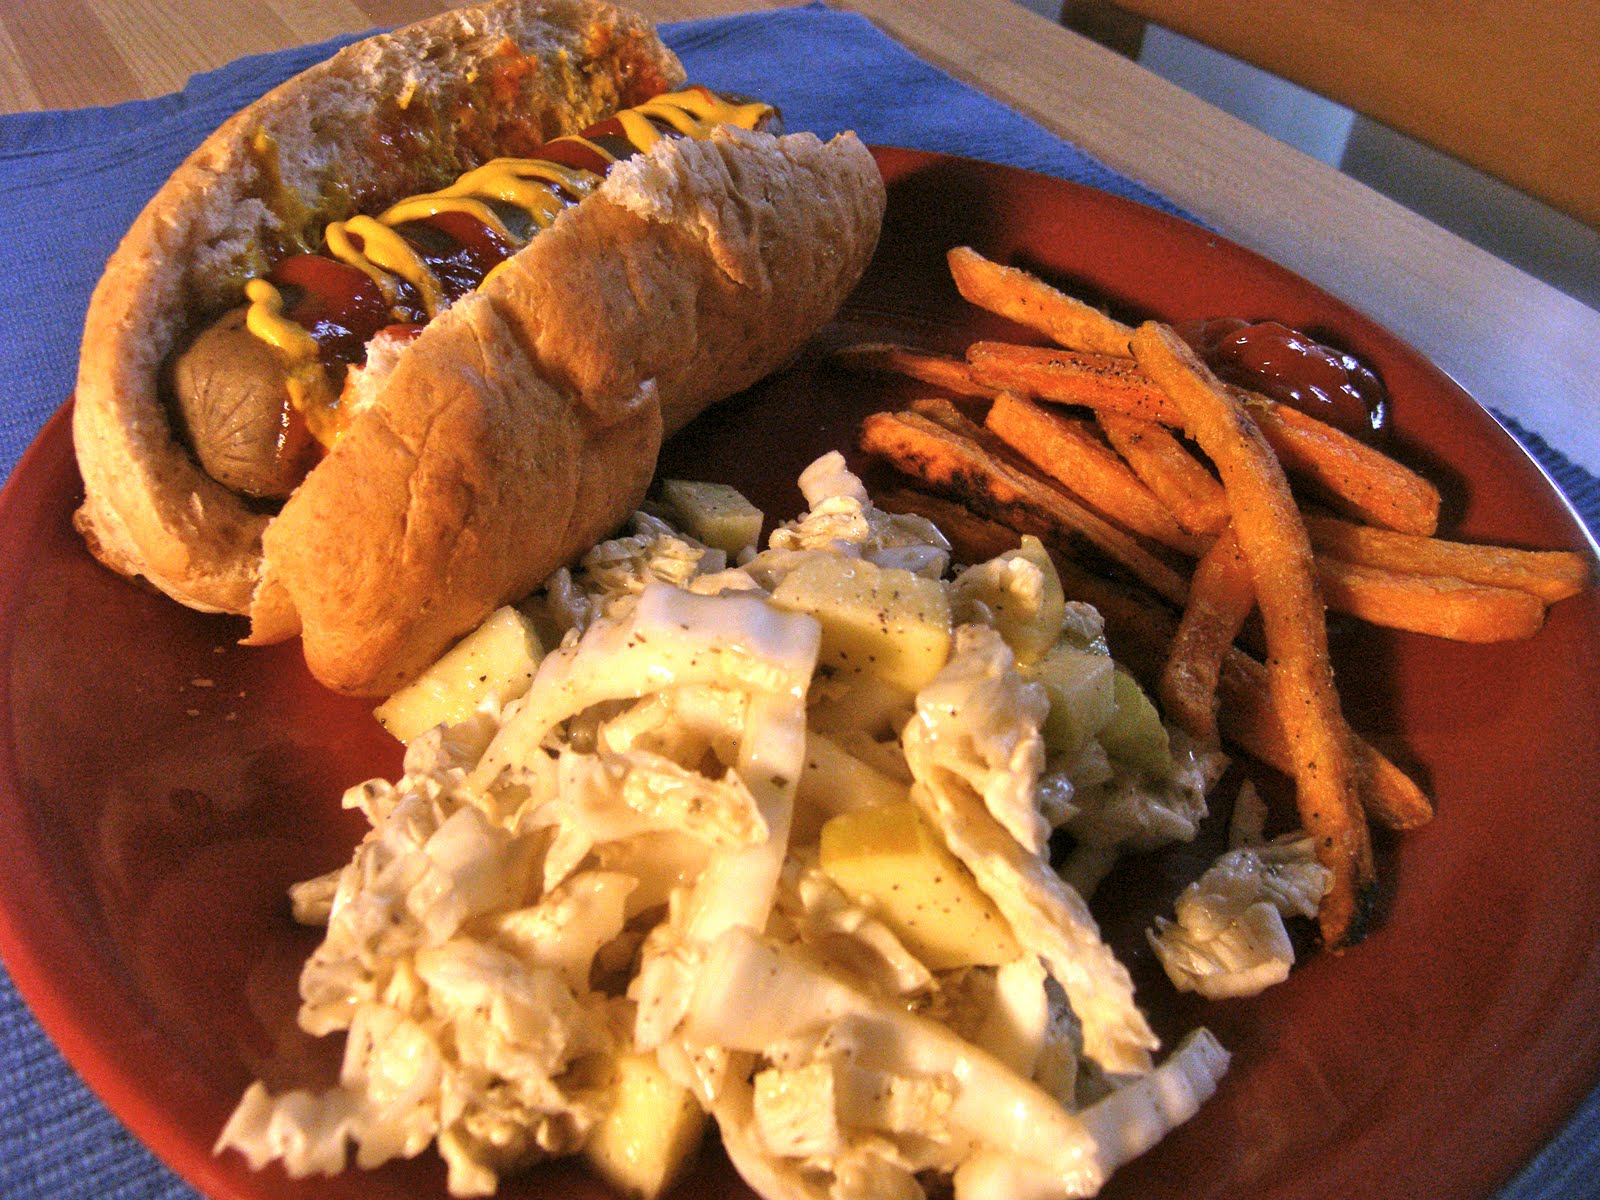
The semester is almost over, which means soon it will be summer. I am staying for summer classes so I will miss the lovely summer back home in Oregon.  So I decided to bring a little of an Oregon summer to me with a Tofurkey brat, sweet potato fries and an light coleslaw.

Tofurkey is made by the Hood River, Oregon-based company Turtle Island Foods Inc, —and one of the best vegan brands out there. Not only is their name-sake product, Tofurkey amazing (even my carnivorous dad and brother look forward to some every Thanksgiving), they also make delicious brats and sausages too. Their Beer Brats are my favorite. They make me think of home because they are made with Full Sail Ale (another fine Oregon product). The texture and taste are perfect, and they are even juicy and sizzle on the grill. I put mine in a whole wheat bun, and topped it with ketchup and mustard. Doesn’t get much more summer-y than a big juicy brat. And you will live to enjoy more summers since this brat has zero cholesterol.

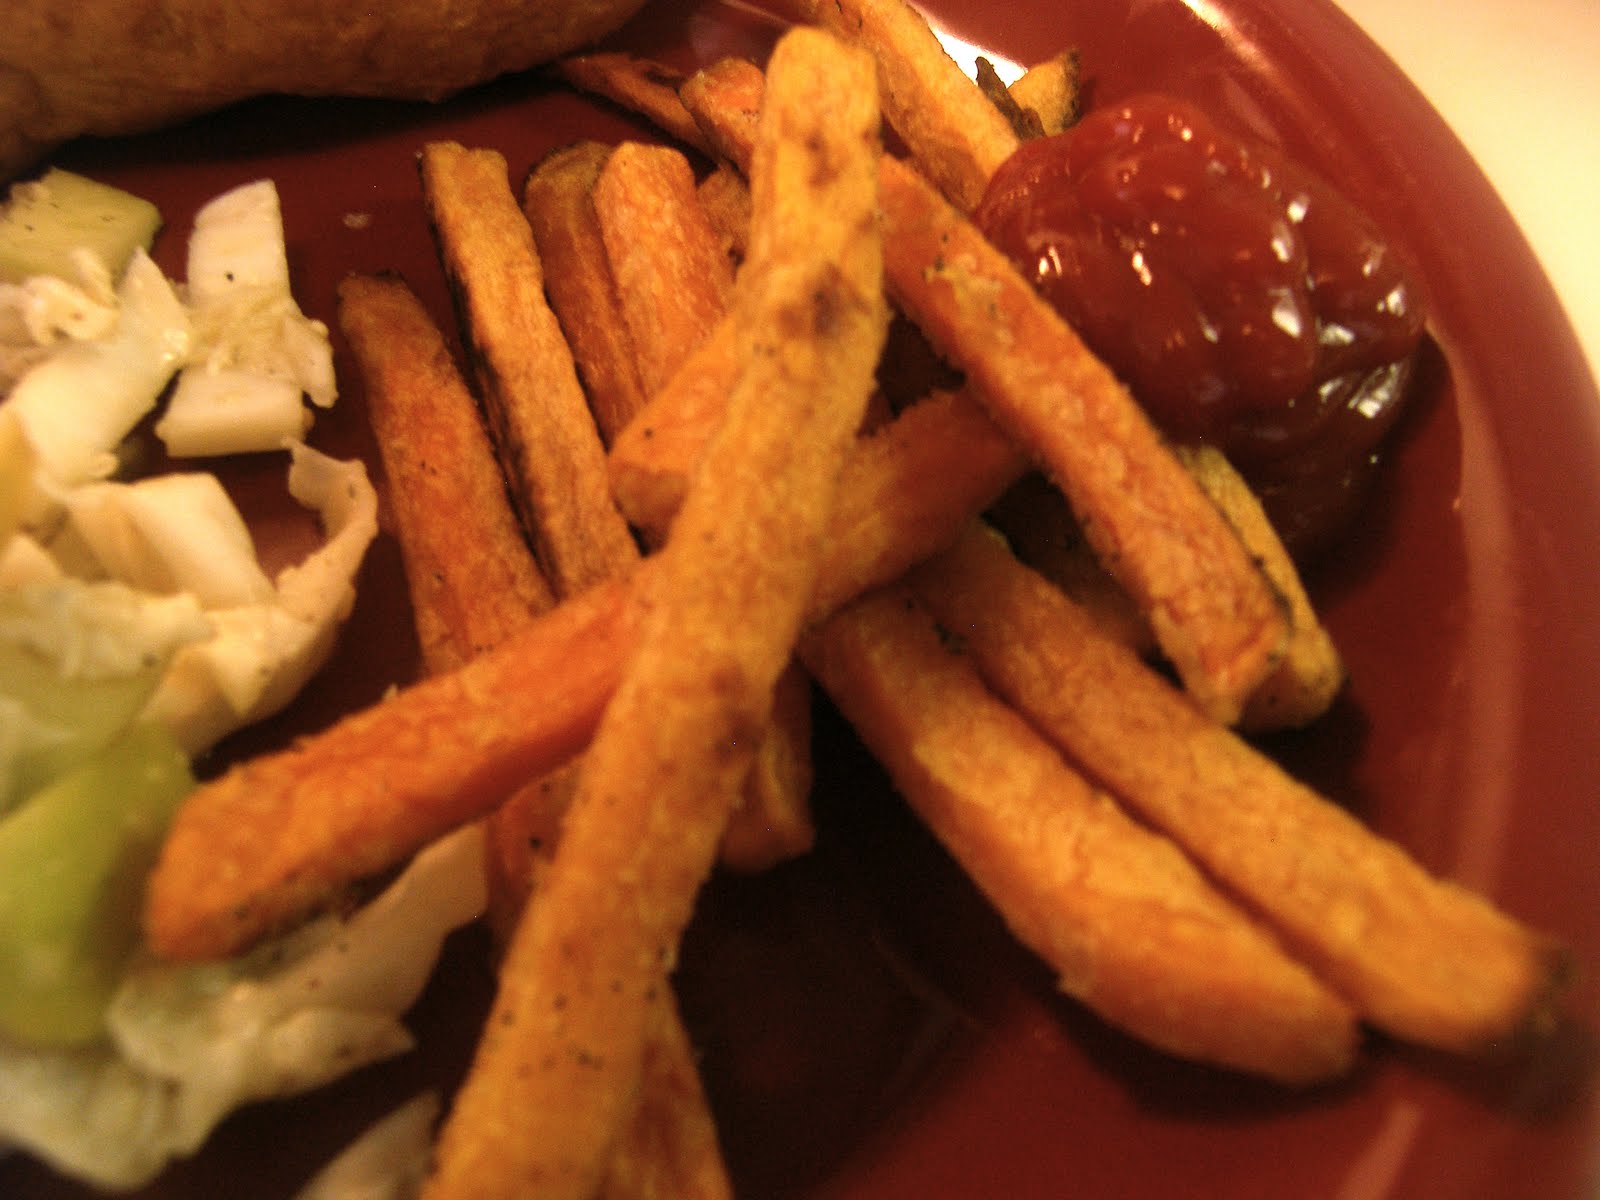
Sweet potatoes are not only sweet, but super as well. They are a superfood, which means they have a lot of vital vitamins and minerals. Sweet potatoes are packed with fiber, antioxidants, and anti-inflammatory properties. I love them in curries and stews, but they make great fries. I have always liked them better than regular fries, especially when seasoned with herbs. They are easy to make, but I had a few Alexia Sweet Potato Julienne Fries in the freezer that needed to be eaten.

I had some cabbage and apple that needed to be eaten as well, so I made a simple light coleslaw. I hated coleslaw as a kid because they were the traditional “more-mayo-than-anything-else” style. I like mayonnaise, just in moderation. Veganaise is hands down the best mayonnaise ever, vegan or otherwise. Please try it, it’s soooooo creamy. I sadly don’t have any Veganaise so I used Annie’s Goddess Dressing. I also suggest adding raisins, nuts, and carrots to the coleslaw for some sweetness and crunch.

Not only is this meal delicious and healthy, it is also easy. The only hard part is waiting for the coleslaw to chill. This is proof that healthy food can be fast food.

Here Comes Summer Dinner:
Light Coleslaw:
2 cups cabbage, shredded (any kind is fine, I used Chinese)
1 large red apple, chopped (I used golden delicious)
1/2 to 1 cup, depending on taste, Annie’s Goddess Dressing
1 tbs sesame seeds
1/2 tbs mirin
salt and pepper to taste

Brats and Fries:
Frozen Sweet Potato Fries
Garlic salt
Tofurkey Beer Brats
Whole wheat hoagie rolls (the brats are too big for a simple hot dog bun)
Plenty of ketchup, mustard or other condiments

Sweet, crispy, and a little tangy.

To make the coleslaw, combine all the ingredients in a large bowl and mix until the cabbage is thoroughly coated. Refrigerate for at least 2 hours before serving. I made mine the night before. Makes about 4 servings.

 Actual serving size. Don’t let your eyes fool you, it was plenty.

Cook your fries according to the directions on the package. Or, you can always make your own. To cut down on fat, use cooking spray instead of oil to grease your cooking tray. Sprinkle with garlic salt for a nice contrasting flavor to the sweetness.

I fed one of these to an ex once and he had no idea it was tofu.

I microwaved my brat for one minute, but they do come out better on the grill. See the package for proper cooking instructions.

Pop the brat into the bun and top with as much ketchup, mustard or any other condiments you like.

Plate up your brat, a serving of fries, and generous scoop of slaw and enjoy a little taste of summer (and Oregon!)

Glass of Reed’s Cherry Ginger Brew and Animal House
to re-live my UO days, can’t believe it’s almost been a
year since I graduated!

After I left the store, I realized this would have been a perfect Oregon summer dinner if I made a marion berry pie for dessert, but I didn’t feel like going back to the store. I will make it for another post soon.

Mac and Cheese

Bet you didn’t think vegans eat mac and cheese? Well, we do. I don’t think I could be a vegan if I couldn’t have it. Of course it’s not real cheese. There are two ways to make it, with nutritional yeast or with alternative cheeses.

It smells kind of like Parmesan.

Nutritional yeast is deactivated yeast made from cultured sugarcane or molasses. It’s similar to brewer’s yeast, the left over stuff from making beer, but way less “yeasty” tasting. I had never heard of the stuff until I became a vegan. It has a slight earthy/cheesy/yeasty flavor that can boost up any dish that normally has cheese or meat in it. It’s available at health food stores, usually in bulk but I have seen it in packages too. It is fairly inexpensive, so don’t be a afraid to buy some. It’s good on popcorn or pasta for a “cheesy” topping.

It looks like cheese…

I stated before in my Pad Thai Pizza post that I am not a big fan of most alternative cheeses. Although some claim they “really melt,” they don’t. I choose the word pliable to describe them. They are more pliable when heated but not melty and bubbly.  However, I  heard all these rants and raves about Daiya. So I thought I would give it a try. It tasted pretty good out of the bag. The texture is not quite right, but way better then some other brands I’ve tried. It didn’t totally melt, but it got pretty bubbly and gooey. For something I am not a big fan of, I do like this soy cheese. I used both nutritional yeast and the soy cheese in this recipe. 

Mac and Cheese
3 cups elbow macaroni
2 tbs vegan butter

Cheese Sauce:
1 cup nutritional yeast
1 cup non-sweetened soy milk
1 tps mustard 
1 cup soy cheese (I suggest Daiya)
1/2 tps turmeric
1/2 tps cumin
1 tps garlic powder
1 tps soy sauce
1/4 tps pepper

Pre-heat oven to 350 degrees F, if you want to bake it.

Cook macaroni according to directions. Return to pot or a large bowl after it’s drained for mixing. If you are baking it, leave the pasta a little undercooked, it will finish cooking in the oven.

It’s not quite a roux but it keeps the sauce together.

In a small sauce pan, heat butter over medium until melted, then add the nutritional yeast. It will make a lumpy mixture, just stir until everything is well mixed.

I was skeptical when I saw the cheese clump, but it smoothed out

Add milk and mustard, whisk well.  Add soy cheese while continuously whisking. It may clump on the bottom, but should come together as it warms. 

Add turmeric, cumin, garlic powder, soy sauce, and pepper. Heat until it starts to simmer. Taste, it may need a bit of salt.

Pour the sauce over the macaroni and mix thoroughly.

If you like stove-top style,  you can eat it just like this. But if you prefer baked, pour into a baking dish and pop it in the oven for 15 minutes or until it gets golden-brown and bubbly.

Since I’m only cooking for one, I baked mine in individual ramekins. 

I topped mine with some extra cheese and red pepper flakes before I baked it. Breadcrumbs are a good choice too, gives it a nice crunch.

It’s creamy and gooey just like dairy mac and cheese. See, being a vegan does not mean just boring vegetables.

Here are some other recipes to try too:
http://vegweb.com/index.php?topic=8295.0
http://www.thekindlife.com/user_recipe/view/10014/115/1 
http://allrecipes.com//Recipe/vegan-mac-and-no-cheese/Detail.aspx