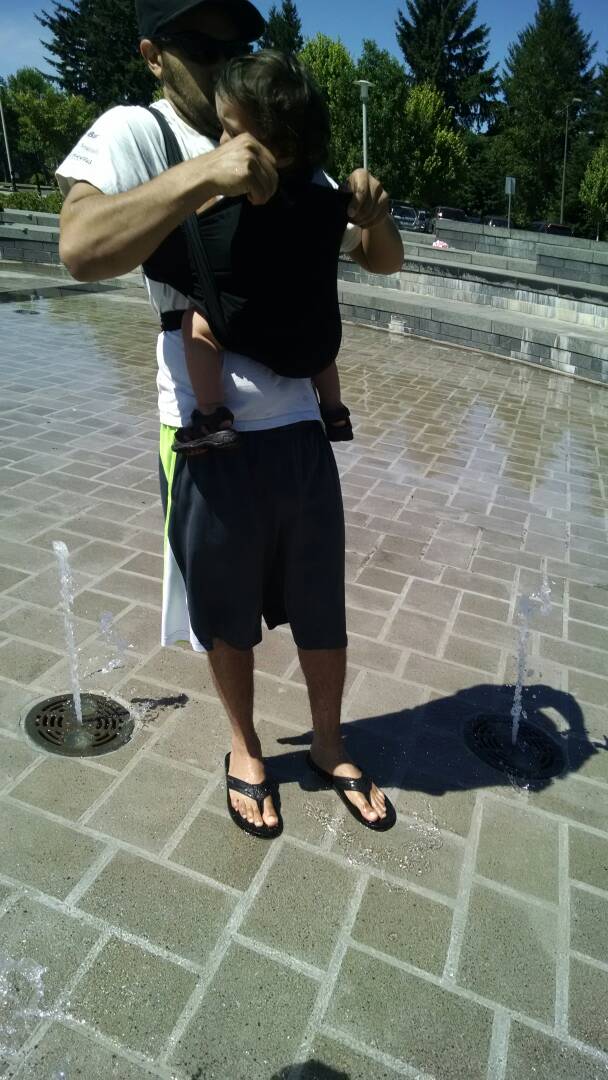
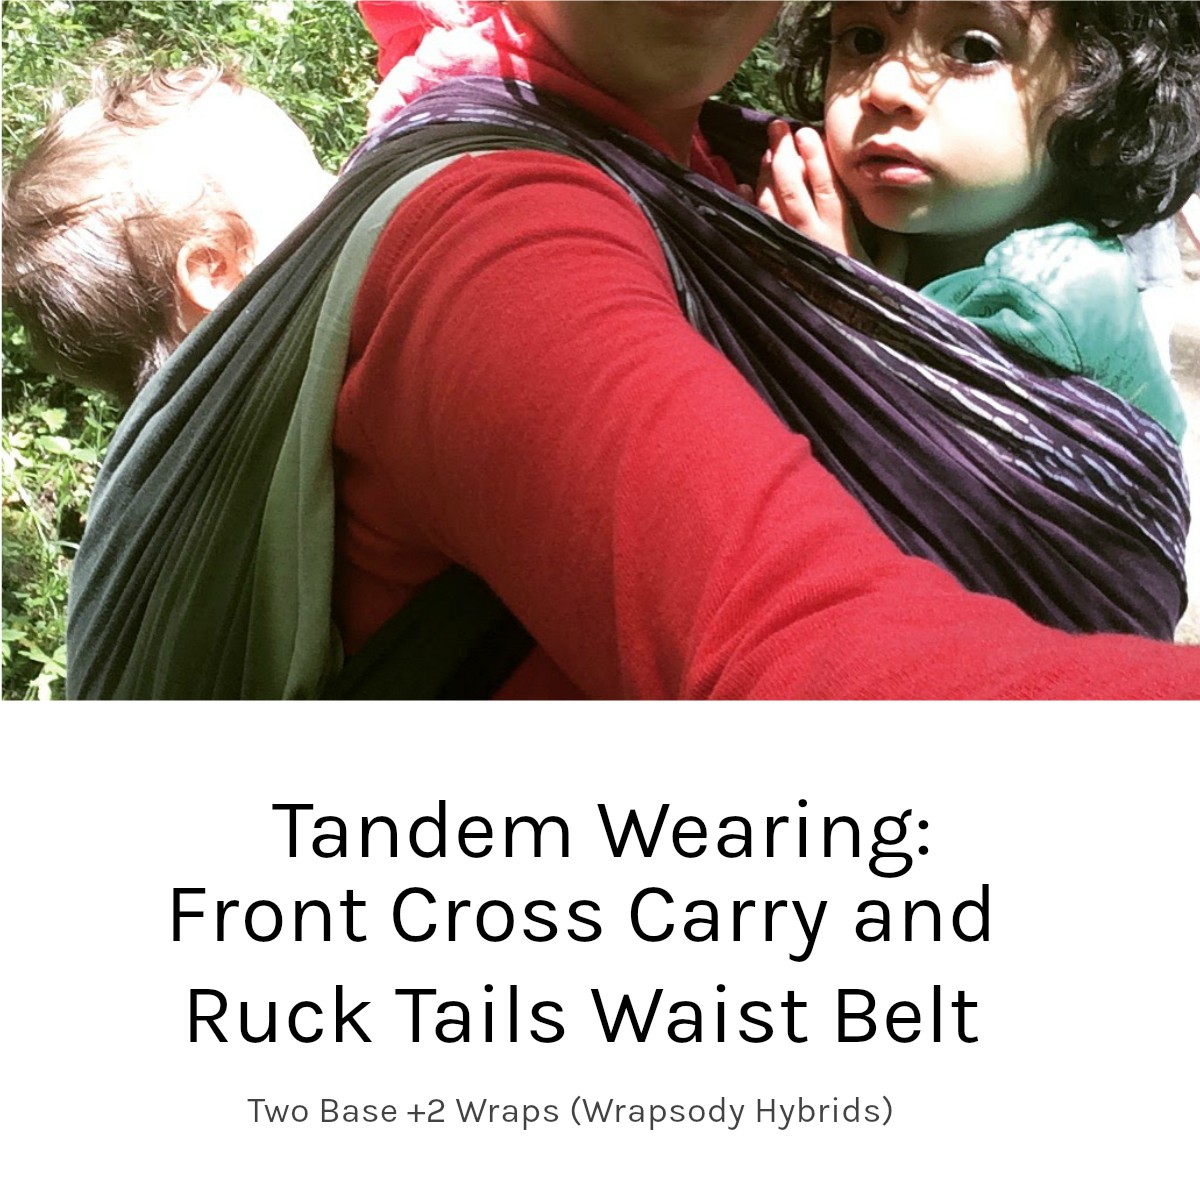
Start with a front wrap cross carry in the front for the child that will want to go up and down as needed. In my case, this was my 3-year-old.
On the back, a Ruck with the tails brought back over baby’s legs and tied under bum for an added waist belt. This uses up the extra tail and gives a little more support for your back.
Now go off on your adventure and pop your walker in and out as needed!
Oh, the controversial facing forward. In a nutshell, there are several arguments for not facing baby forward. It can be overstimulating, uncomfortable for wearer and wearee, no head or neck support, you cannot see baby’s need cues, and not ideal position for sleeping. I agree with most of these claims. It can be overstimulating if you kept baby in that position all the time. You might naturally hold your baby facing out for a short while, but you probably wouldn’t hold like that for a long time—and probably not while moving around. It would be hard to keep baby secure. You would probably turn them to face you eventually. But, you would do this holding baby, so it is reasonable to do this in a carrier. It is a bit harder to see if baby is giving you any signs or cues, but it’s not impossible. Just pause and take the best look you can—just like you need to do with baby facing towards you as well.
If the wrap is supporting baby in the optimal high and tight position with knees higher than bottom, then it can be comfortable for both baby and you. If you were holding baby facing out, you would probably hold baby up high with their bottom on your forearm lifting knees higher than bottom. This would boost up baby high enough to fairly easily see baby’s cues. Even with baby up high and tight, this may not be enough head or neck support for babies who have little or no head control. Your natural instinct is to totally support a newborn’s body, so you probably wouldn’t hold a baby who couldn’t support there head facing outward. But, you might once baby got a bit more control, so it’s reasonable to try in a carrier.
Check out my tutorial on how to achieve a FFO carry with deep seat in the optimal position:
You finally made it to toddlerhood! They are (hopefully) sleeping through the night, feeding themselves, and saying good-bye to diapers. But this newfound independence may make wearing a challenge. Having to chase them into the carrier. Hair pulling or being smacked with random toys. Or seat popping in protest of leaving the park. A whole new set of challenges in wearing now.
Toddler in arms, supported knee-to-knee under his bottom.The basic safety rules of babywearing still apply. The carrier should mimic how you would hold your toddler in your arms. Still high and tight—low and loose would start killing your back after a short while. High and tight on your body helps distribute their weight more evenly across your whole torso. Low and loose puts all the strain on your lower back. You would never (willingly) hold your toddler like that, it just wouldn’t be comfortable for you. Your toddler’s should also be supported knee to knee, with the carrier coming at least up to their shoulder blades. This mimics the way you would probably hold them, forearm under the bottom and the other arm over their upper back to keep them tight to your body (to keep them from escaping).
Knee-to-Knee support, carrier supporting up to shoulders.I’ve heard some wearers say that ring slings are not good for toddlers. The one shoulder carry can start to hurt your back as your child gets heavier, their weight isn’t evenly distributed. I argue that a one shoulder carry could hurt your back at any weight when wearing for long periods. Especially if you do not have the carrier adjusted properly. Personally, I don’t like ring slings for wearing for more than an hour continuously.I wore my newborn for a short hike the other day and my shoulder was hurting towards the end. It’s the design of the carrier, not the weight of the child.
One shoulders can be very comfortable short-term when done properly.I think ring slings (I am using a Wrapsody Jareth) are great carriers for toddlers actually. Prep the carry on your body so you all ready to put them up when needed. If you can catch them, simply open the bottom rail and slide the carrier over their head to get them in the carrier quickly (I call this the trap and secure). You can let them out similarly, loosen the bottom rail and let them gently slide out (useful for random crying fits that magically stops when they see a cookie). On your hip, they can see forward to appease their curiosity, without totally limiting your range of movement. But they can still tuck their head in for that elusive nap. Ring slings are a simple choice for toddlers. Pull the sling up over their back, then tighten and go! No buckles to reach for or passes to spread.
The key to a successful ring sling with a toddler is good seat. Get a decent amount of fabric between your bodies, this makes it harder for them to pop the seat when they wiggle. Getting the fabric knee to knee will keep your toddler in a spread-squat position, keeping both your and them comfortable.
High, tight and secure. Rucks are simply and supportive for toddlers.I’ve also heard wearers say that a Ruck is a terrible back carry for toddler (I am using a Wrapsody Stretch-Hybrid Nammy O/S). The single layer pass isn’t supportive enough for all the toddler wiggles and the seat can easily be popped as they bounce around. I argue that any carry, multilayered or not, can be popped if your kiddo tries hard enough.
Even though he is a major seat popper, this properly secured seat stayed in place.A ruck is very supportive at any weight if you get a nice deep seat. It mimics the way you might hold your toddler on your back, both arms under their bottom. Most toddlers have great torso control and don’t need an arm to hold them upright, just a place to sit their bottoms and secure their legs.
Knee-to-knee with the bunch passes pinning it in place. Close to unpoppable.The key to a good Ruck is a supportive seat. There has been some discussion about whether a seat needs to be deep or just knee-to-knee. My personal experience is that both matter. A good amount of fabric between you and the wigglemonster will make it harder to keep the seat from popping. And knee-to-knee support will more evenly distribute your toddler weight across your body, making it more comfortable for you.
Enjoy those toddler wrap snuggles while you can! They may act all big, but they are till your babies who need you once and awhile!
Let me fill you in on a little secret for newbornwearing—the key is a supportive seat. Well, actually that’s the key for babywearing in general. A good seat can look different depending on the type of carrier and the carry. But in general, baby should be in a position similar to how you would hold them in your arms long term.
Newborn natural position, legs tucked up higher than bottom.
You would probably cradle their legs up, making baby smaller and easier to carry. You would place your hands or arms on their bottom or torso, keeping their body fully supported. What I just described follows the standard rules of babywearing safety: high, tight, knees higher than bum. . These rules weren’t made up at random, they follow you and your baby’s natural tenancies. Let’s take a look at the seat on a few different newborn wrap carries and see how the mimic being held.
Front Wrap Cross Carry Legs In. [Wrapsody Stretch-Hybrid Brishen O/S] Recently, there has been a push baby’s legs being out right from birth. People stating legs in could put pressure on baby’s hips, causing hip issues. There is no evidence to support at this time. Think about how you hold baby, do you spread out baby’s legs every time pick them up? Or do you naturally let them fall where they may and just cradle them up for support? Maybe they are tucked up beside them or maybe they in a spread-squat position. I can say from personal experience my oldest’s legs were stuck tucked up until he was 3-months-old. I couldn’t get him to do legs out without him screaming. And my youngest can do either right now, just depends on the day really. So I don’t see the need to shun all legs-in carries. If that’s baby’s natural position in arms, why go against it in a carrier?
Carry supports the natural C shape of baby’s spine.There are a few things to watch out for when placing baby legs-in a torso pass like that in a Front Wrap Cross Carry. The wrap should support the natural C shape of baby’s spine, with hips rotated towards your body.
Weight resting on baby’s bottom, no pressure on feet.Legs in the a frog-leg position, knees higher than bottom with feet parallel to ground. The cross passes should close off the bottom of the torso pass, preventing baby from slipping out the bottom. These steps will ensure baby is in a natural position without any unnecessary pressure on little hips or feet.
Front Wrap Cross Carry with a Twist. [Wrapsody Breeze Dinah] Some babies are born with legs uncurled, so legs-out from the start is a wonderful choice. However, for some babies bringing the cross passes under baby’s legs in a basic Front Wrap Cross Carry can puts too much pressure on their little legs. If you were holding baby, you probably wouldn’t place your arm under baby’s legs, awkwardly pushing them away from your body. This is not an natural position, so not the best carry for some babies. A lexi twist under baby’s bottom secures the bottom of the torso pass while bringing the cross passes away from baby’s little legs.
A Lexi Twist under baby’s bottom to secure the torso pass.This a simple variation that even a beginner can easily achieve. Once baby is in and the wrap tightened, instead of a just once, cross several times—I usually do 3 to 4 times—under baby’s bottom into a twist. Then take the tails behind you like normal and tie. The key is to keep the tension while twisting so baby stays high and tight.
From the side, you can see that the seat is not terribly deep, but secured nonetheless. No need to add stress to tiny newborn legs.Also note that even though baby’s legs are spread out, the area between them is still small. Not much room to get a lot of fabric between you and baby. For this reason logistical reason, don’t stress about making a deep seat with a newborn. You should have some fabric between going between baby’s knees so baby is bottom is supported (like how you might place baby’s bottom on your forearm).But no need to stress about mastering a deep seat yet, this a crucial skill you can work on later.
Pocket Wrap Cross Carry Facing Forward Outward.[Wrapsody Stretch-Hybrid Kailani] Oh, the controversial facing forward. In a nutshell, there are several arguments for not facing baby forward. It can be overstimulating, uncomfortable for wearer and wearee, no head or neck support, you cannot see baby’s need cues, and not ideal position for sleeping. I agree with most of these claims. It can be overstimulating if you kept baby in that position all the time. You might naturally hold your baby facing out for a short while, but you probably wouldn’t hold like that for a long time—and probably not while moving around. It would be hard to keep baby secure. You would probably turn them to face you eventually. But, you would do this holding baby, so it is reasonable to do this in a carrier. It is a bit harder to see if baby is giving you any signs or cues, but it’s not impossible. Just pause and take the best look you can—just like you need to do with baby facing towards you as well.
Left: legs dangling and spine stretched out, not a natural position. Right: Hips rotated, knees higher than bottom, and spine in a natural C shape. Baby is also high, tight, and close enough to kiss.If the wrap is supporting baby in the optimal high and tight position with knees higher than bottom, then it can be comfortable for both baby and you. If you were holding baby facing out, you would probably hold baby up high with their bottom on your forearm lifting knees higher than bottom. This would boost up baby high enough to fairly easily see baby’s cues. Even with baby up high and tight, this may not be enough head or neck support for babies who have little or no head control. Your natural instinct is to totally support a newborn’s body, so you probably wouldn’t hold a baby who couldn’t support there head facing outward. But, you might once baby got a bit more control, so it’s reasonable to try in a carrier.
Baby wake, holding up head his own.The biggest reason lack of head support is an issue is it could compromise baby’s airway. Baby’s head rest against your body when facing inward, making it easier to keep chin off their chest. Facing forward with no head support could force baby to slump forward and close off their airway—especially when sleeping. This is why I agree to never keep baby facing forward when they fall asleep. I do not suggest this carry until baby can hold their head up independently. My son has good head control so I am comfortable placing him in this carry occasionally. Get baby high and tight in the wrap. Take time to make sure you can easily peep down at baby’s face. When you gently sway back and forth, you baby should move as one unit. Baby should swing around in the wrap. Just like your arms would move with your body holding baby, not swing baby away. Rotate baby’s hip’s forward so baby is in a seated position with knees higher than bottom. And I mean actually rotate them. Reach into the carry, gentle grab baby on both hips. Tip them backward and downward. Adjust the cross passes as needed, making sure baby is supported from back too belly button and knee to knee. Keep the torso pass off of baby’s face to keep their airway clear. And keep it off baby’s legs, this might add unnecessary pressure.
I hope you have some insights into how to give your newborn the best seat possible. Remember to take your time getting yourself and baby comfortable in any carry. It’s not a race, it’s loving journey!
You know your favorite cotton t-shirt, all soft and comfy? The one with just enough stretch, but still keeps it’s shape. That’s what a Wrapsody Stretch-Hybrid is like. I have talked about how I became a Brand Ambassador before, but realized I have never actually reviewed a Stretch-Hybrid. I take them hiking all the time and somehow never actually wrote a post! Until now.
Manufacturer: Wrapsody Baby Colorway: Kristen Color: Purple, blue, light blue, green, light green and white Pattern: block horizontal sections, dandelions Size: 8 (6 yrds) Materials: 100% cotton Weave: Plain, jersey
My friends son, pic posted with permission. Shows how the the different colors help you learn the parts of the wrap.
This colorway is meant for teaching. The center of the wrap is block of purple, so you have a better visual of the center of the wrap (where to place baby). There are two different color tails—blue and green—so you can see which one you are working with and not get confuse as you wrap them around you. And the dandelions make it easy to distinguish the rails from one another. The wrap is named after Kristen DeRocha, the owner of HotSlings and one of the pioneers for modern babywearing in America.
Before I delve into the review, I want to say more about these wraps in general. First of all, these are hybrids, not a standard stretchy wrap. This means they are suitable for front, hip and back carries as well as single layer carries. True stretchy wraps are only suitable for three-layer front and hip carries. Stretch-Hybrids stretch in one direction, as oppose to stretchy wraps that stretch both directions (hence why you need multiple layers to give enough support). They are tested up to 35 lbs so they can go well into toddlerhood and beyond.
Also, other than colorway, most Stretch-Hybrids are the same. Same stretchiness, same support, and same look. Once you decide you like the way it wraps, there is no need to worry the next one will feel different. This also makes it very easy to fall down the rabbit hole and buy every one you can get yours hands on, fortunately or unfortunately.
I have taken hybrids on several hikes before. They are my go-to wraps when I just grab one off the shelf and go. This wrap actually went on two very awesome hikes. The first was a the Walk With Wrapsody hike I co-hosted with fellow brand ambassador Myste (check out her blog).
Location: Hyland Forest Park Distance: 1.34 miles Trail Type: Dirt and tanbark Weather: Sunny and warm Trail Conditions: Clear trail, a few mud patches, and slightly busy
This lovely nature park is nestle in the south of Beaverton. It features a few miles of easy trails that most walking toddlers can easily handle. There is a nature play area in the middle that I have not yet explored yet, too.
We started off letting the big kids hike ahead of us, so I used Kristen to to wrap my belly (Full Body Support Belly Wrap). I love hybrids for belly wrapping, just enough give to get it tight but not so much that it sags over time.
Then towards the end of the hike, Myste’s daughter decided she wanted an uppy so I handed Myste Kristen. She did a basic Ruck over the Front Wrap Cross Carry she had her youngest daughter in on the front. Tandem wearing for the win! The wrap very easily supported her toddler and she had no issues getting her up.
Next I took the wrap on a shorter hike of sorts. We went berry picking at West Union Gardens with my mom. We ended up walking over a mile through the berry fields.
I love this place, nice clear bushes and they only use organic spray when they really need it. Jack started off walking so he could eat all the berries he wanted. It was fun to explain to him how to pick a good berry and watch his face when he got a sour one.
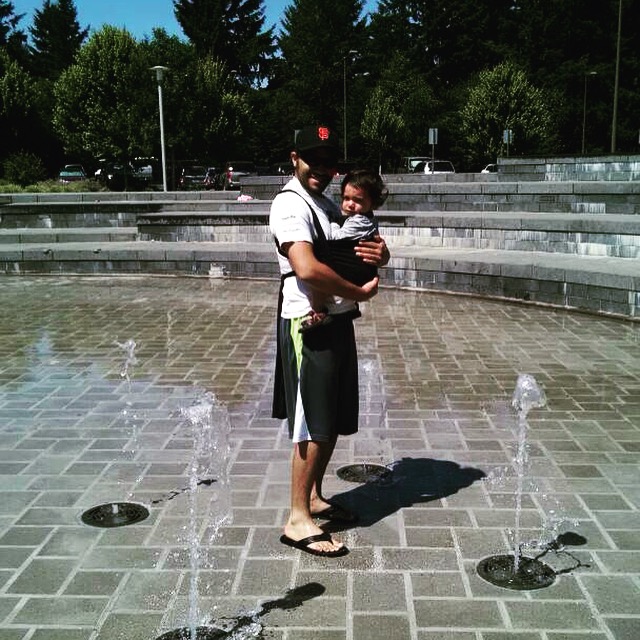
Then he realized he could eat berries faster if he got an uppy. I did a Wiggleproof Back Carry and added a Chest Belt.
It took a bit to get it tight enough with a wiggly toddler begging for more berries though.
I am pretty sure everyone else in the field thought I didn’t know what I was doing, but I want to see them wrap 8 months pregnant with a rambunctious toddler!
Jack was happy on my back eating berries (he kept sticking his hand over my shoulder when he wanted another). He stayed up for 30 minutes and I was very comfortable. No pressure on my bump at all.
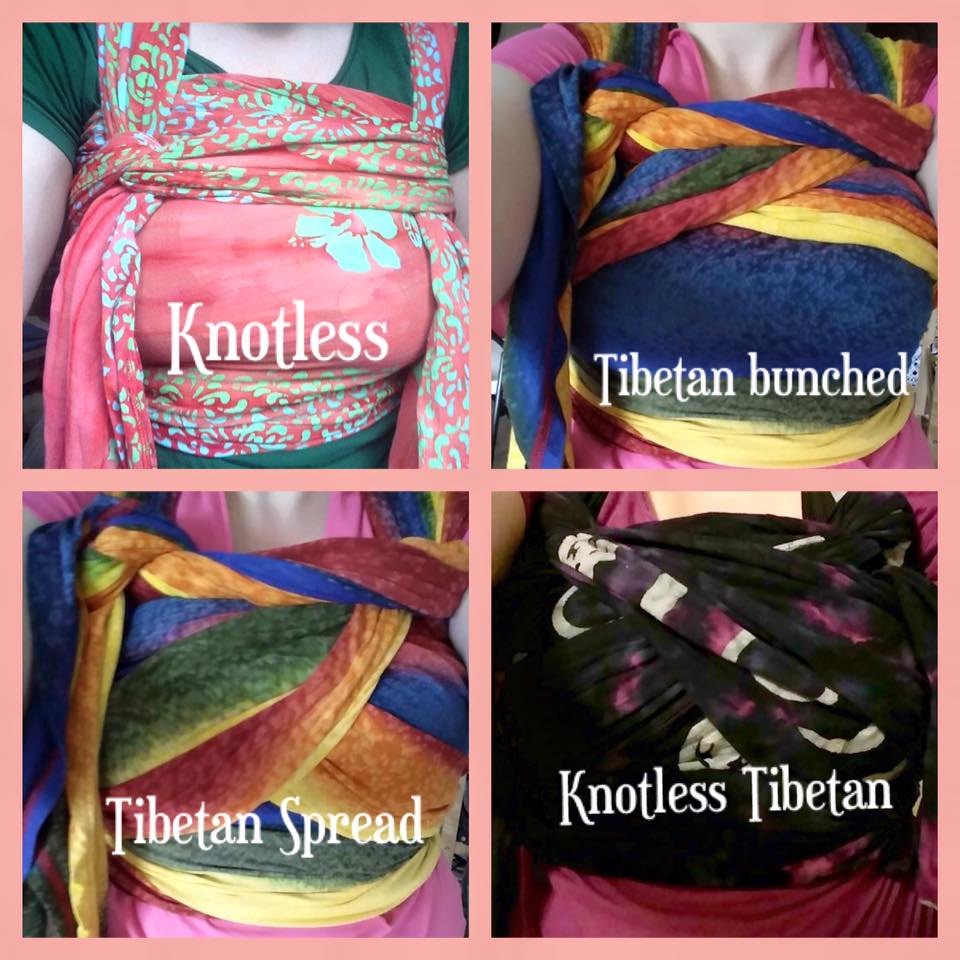
And just the other day I put Jack up in a Ruck Tied Tibetan while I was cleaning around the house and then walked him over the park after. Very comfortable the whole time.
The key feature of the wrap is texture—that soft and stretchy jersey feel. It molds very easy to any body shape and baby size. It glides easily while wrapping without any big bulky knots. However due to the slight stretch, it can take a bit more time to get all the slack out. When I hear people complain hybrids are diggy, the first thing I look for is the hidden slack. You need to make sure your carry is tight and there are no pressure points. Once tightened properly though, oh man they are a supportive dream. Another draw back in the length. In order for the wrap to be accessible to wearers of all sizes and skill levels, they come in one standard long length (about a size 8 in woven wraps).
This is great for when you are learning and doing multiple layer carries like a Pocket Wrap Cross Carry. Or if you are plus size, no need to struggle with a wrap that is too small. But if you are short like me, you end up with A LOT of extra tail. This isn’t totally a bad thing though, I get to do some fun finishes.
Can you hike in a Wrapsody Baby Stretch-Hybrid? Yes! This wrap is light-weight enough to work in all weather scenarios. It fits over winter layers easily and cool enough for summer heat. It’s supportive enough for most trails types, especially with reinforcing passes on harder trails. Suitable for newborn to preschool as well. And if Kristen is not your cup of tea, try one of the many other colorways. My husband loves Nammy, while I am partial to Brishen.
You can take a hands-free shower without a screaming baby in the other room stressing you out. And nurse them at the same time! Then there is the joy for moms and children alike: summer water activities. Pools, splash pads, calm streams, and other fun water features.
First, follow all the standard rules of babywearing.
Follow all instructions for the design of the carrier.
Make sure baby’s airway is clear and unobstructed at all times. Chin off chest and no fabric over their face.
Baby is secured in the carrier and it fits tightly against your body. You should both move as a cohesive unit.
Baby sits in a natural position on your body, close enough to kiss the top of their head easily.
Also, keep these safety rules in mind:
Be mindful of the water level. Baby’s head should never go under water. And watch for waves that can splash baby unexpectedly.
Make sure the spray/current it not too powerful. Don’t want baby to get knocked out of the carrier or be injured.
Watch the water temperature. Too cold can cause hypothermia and too hot can cause burns. Just use common sense and keep an eye on baby.
Keeping all that, wearing baby in the water can be really fun! You can stay cool, keep baby happy, and do some fun carries! The WrapDuo is suitable for most front and hip carries. That means you can try different carries as your baby grows.
You can start with a Pocket Wrap Cross Carry. A great beginner carry, very supportive for smaller baby without head control.
It’s also a poppable carry, meaning you can take baby in and out without needing to take the wrap off.
Easy to take baby out for a diaper change, then right back in for fun.
Makes chasing a toddler around a splash pad easier with a newborn.
Another snuggly to try while baby is working on head and trunk control is the Kangaroo Carry.
It is a bit more advanced, but very supportive once you get the hang of the shoulder flip.
Perfect for snuggles when baby is tired.
You can keep playing while they fall asleep, then set them down very easily in this carry since there are no cumbersome cross passes to take off.
However, it is great for a baby who has better body control but isn’t mobile yet. They can look around easily and pull their arms out to explore.
And if they get sleepy, you can spread the cross passes and support their head while you rock them to sleep.
This is a wet/dry wrap, so it is ideal for a day at the splash pad when you don’t really plan on getting wet but don’t want to risk ruining a beloved wrap.
When your baby is close to no longer being a baby, hip carries are a great options. Baby can look forward more while still snug to your body.
Try a Robin’s Hip Carry, easy to adjust as baby wiggles around and very supportive.
If you are having a hard time tightening the WrapDuo with your bigger baby, try getting the wrap totally wet first. It denses up and becomes more supportive.
The dry weight limit is 25 lbs, while the wet limit is 35 lbs. And there is a notable difference once baby gets close to 25 lbs mark when dry.
As your baby turns into a toddler, you can still get some use out of your WrapDuo.
Your toddler can work on their swimming skills until they get tired, then pop them in the wrap for some snuggles.
Water babywearing has been around for a long time. How do you think women fished and got water for thousands of years? But I am sure they would have loved the quick drying material of modern day water carriers. Get a water carrier like the WrapDuo and work on some new carries while you explore the water with your child!
For the past 20 weeks, I’ve been hosting the Wrapsody Weekly Wrap Challenge along with fellow Brand Ambassador Nicolette. It’s a little idea I came up with to help promote the brand on social media. It is was inspired by a challenge I did from BWI of The Bay Area. I learned so much from that challenge, it honestly made me a better wrapper. So I decided to spread idea and help others build up their skills.
So I designed a challenge that could be done over time, so no one left rushed or got frustrated. A week to work on a carry and ask for help. It started with basic carriers that a novice could handle. Then move on to a new, more advanced carry the next week. And the carriers would build off each other, the skill learned one week would be needed for the next week. That way the wrapper gets the fundamentals of how to build a good carry. I also needed to do carriers that can be done with longer wraps, since most Wrapsodys are size 6+.
Thus, I came up with this list. Twenty weeks to help you go from a novice to a back wrapper.
After some consulting with fellow ambassadors, I came up with this list. Nicolette and I decided to alternate each week. Post a 360 degree photo collage and a tutorial video on Sunday. A reminder on Wednesday. And a Feature Friday to encourage participation. We also offered help and answers questions when we could. Other ambassadors helped too.
But let’s talk about the carries and how they help you learn.
Week 1: Pocket Wrap Cross Carry. A front carry with two cross passes, and torso pass over top. A very basic carry to help you learn the feel for wrapping. A pre-tied carry, meaning you tie the wrap on yourself before you place baby.
Week 2: Front Wrap Cross Carry. A front carry with a torso pass, and two cross passes over top. Another basic carry to help you get comfortable with your wrap. This is a step up from the PWCC as it is not pre-tied and the torso pass is underneath. This means you need to learn how to make a good seat for baby and his to tighten the whole carry properly.
Week 3: Front Cross Carry. A front carry a horizontal pass, and two rebozo passes. This is a pre-tied carry like the PWCC, but is a step up from the FWCC because there is no torso pass to provide extra support. This means you need to place baby in a good, deep seat in the X of the rebozo passes.
Week 4: Kangaroo Carry. A front carry with ruck pass, two shoulder flips, and two bunched passes. A wonderful carry for newborns or any sleeping baby, Just in untie and gently place them down without cross passes to get in the way. The shoulder flip can be a bit tricky, but makes this carry very comfortable long term.
Week 5: Front Double Hammock. Front carry with a ruck pass, a torso pass, two shoulder flips. A step up from a Kangaroo carry as it has two layers for support and starts off center. Several other carries going forward start off center, so it’s good to practice that now. This also wonderful prep for the ever so comfortable back Double Hammock later on. Helps you visual what will be going on behind you.
*Please do not attempt hip carries until your baby can sit up unassisted.*
Week 6: Hip Rebozo. A hip carry with one rebozo pass tied with a slip knot. Time for hip carries! This carry is normally done in a short wrap so there is not a lot of tail, so I almost left it off the list. But it is the base for several other carries up next so I left it on. Nicolette just reinforced it to get rid of the extra tail. Slip knots can be tricky to learn, so take your time and go slow. But they are a great tool for to tie a carry at the shoulder without a big bulky double knot.
Week 7: Robbin’s Hip Carry. A hip carry with a rebozo pass, shoulder loop, and two bunched passes. A step up from a rebozo with the very comfy shoulder loop and two bunched passes to reinforce the seat. The key to get it right is the placement of the shoulder loop. Too high will dig into your shoulder. Too low will put pressure on your back. Aim for the corsage position.
Week 8: Poppin’s Hip Carry.A hip carry with one rebozo pass, and poppin’s pass. Think of this as a Robin’s Hip Carry, but with the loop going the other way. The lovely poppin’s pass adds support and reinforces the rebozo. Plus it is a great way to showcase the opposite side of the wrap.
Week 9: Hip Cross Carry. A hip carry with two cross passes. This is essentially a Front Cross Carry, but on your hip. The key is to get baby knee-to-knee supported and make sure the X is hitting high on their back. This poppable hip carry is great for a day at the park. Baby wants to run around but needs a quick uppy for a breather once and awhile.
Week 10: Coolest Hip Cross Carry. A hip carry with a torso pass and a rebozo pass tied with a slip knot. This carry can be tricky to place baby in correctly, so go slow and make sure you get a good, deep seat. The slip knot makes it very easy to tighten and loosen for nursing.
*Please do not attempt back carries until your baby can sit up unassisted if you are new to wrapping. Practice against a wall, over a bed, or with a spotter until you are confident.
Week 11: Secure High Back Carry. Back carry with a chest knot, rebozo pass, a spread pass, and a bunched pass. Time for back carries! This carry is the main reason I left a rebozo on the list. Starting with a good pre-tied hip rebozo then scooting it on to you back helps you gain confidence with back carries. You baby is safe with the pre-tied chest belt pinning them in place. You already have a good seat, so no worries about their comfort. This way you can focus on how to spread the passes behind your back and get them in the correct position without fear of baby falling. You can feel how the rebozo pass provides the seat, the cross pass reinforces with support, and the bunched pass helps lock the seat in place. The foundation of a great back carry!
Week 12: Back Wrap Cross Carry. A back carry with a chest knot, horizontal, and two cross passes. Another great beginner back carry due to the chest belt to secure baby before you fiddle with the rest of the passes. To help you visual what’s going on, think of this carry as everything you do in a FWCC, but on your back (hence the name).
Week 13: Ruck.A back carry with one ruck pass. No more pre-ties, it’s time to learn how to get baby up on your own. This is the most basic back carry and often the hardest to get right. A ruck is the base for several of back carries, so it’s so important to get this one right before moving on.
Week 14: Double Hammock. Back carry with a rebozo pass, a torso pass, horizontal pass, two cross , and two bunched passes. The ultimate multiple pass carry, so supportive and comfortable. A torso pass in a back carry can be tricky to master, so take your time. Tighten tighten tighten, a loose torso pass will make this carry uncomfortable. Make sure the horizontal pass goes high over baby’s back as well, this will add support and keep them from leaning back.
We also had some fun with this week and showed off all the variations.
Week 15: Christina’s Ruckless.A back carry with a rebozo pass, torso pass, ruckless chest belt, and two cross passes. A step up from a Double Hammock as the chest belt is a little more complicated. This a a great carry to take pressure of your back and shoulder, as the V holds all the tension. Make sure it it tighten properly if you are experiencing any discomfort.
Week 16: Giselle’s Back Carry. A back carry with a rebozo pass, a cross pass, shoulder flip, another cross pass. Another carry that starts off center and requires some skills to get the wrap spread high over baby’s back to ensure enough support. The shoulder flip in a back carrier is the same principal as in front carries, but can be tricker since you can’t see behind you. It’s essentially a way to make ruck straps in a rebozo.
Week 17: Double Rebozo Shoulder to Shoulder. A back carry with two rebozo passes and a shoulder to shoulder chest belt. Similar to the Secure High Back Carry with the hip scoot rebozo as the base, but a little more tricky as there are no bunched passes to keep the seat secure. You really need a good seat in this carry, so I put it farther down on the list to give you time to work on it. A shallow seat will most likely pop, leaving baby unsecured. And even if it does stay in place, it might be uncomfortable in the long run. But once you get it right, this a great carry to do quickly or in a crowded place where you don’t have room to spread out your tails.
Week 18: Jordan’s Back Carry. A back carry with one rebozo pass, a shoulder flip, another rebozo pass, and a horizontal pass. A great carry for leg straightening babies, as the rebozo pass and the horozinral pass lock baby’s leg gently in place, making it hard for them to push up. They aren’t going anywhere!
Week 19: Wiggleproof Back Carry.A back carry with a ruck, two unpoppable passes. Some kids are just leaners, seat poppers, and leg straighteners no matter what you do. Before you give up on wrapping, give this carry a try. There are two unpoppable passes to lock both of baby’s legs down, making it almost impossible for them to mess-up your carry. It’s far down on the list because it takes skill to get these passes right.They can be very tricky to get high up on baby’s back. But keep it at it and you will be rewarded with a very comfy carry!
Week 20: Taiwanese Carry.A back carry with a rebozo pass, a poppin’s pass, a rebozo pass, another poppin’s pass, and a horizontal pass. We made it to the end! By now you should have a good foundation of wrapping skills, most of which you will need for this carry (hence why it’s the end!). A good seat, measuring correctly for an off center start, tightening and keeping the tension as you go, a poppin’s pass, a shoulder flip, and a supportive horizontal pass. Once you get that all down, this carry is AMAZING! No pressure and so supportive.
We did it! You now understand how to wrap your baby. This does not make you an expert yet, but it’s a great start. Keep working on these carries, even the most advanced wearer still learns something new everyday.
You know the one drawback to being an experienced mom? You get to facepalm yourself when you find a new product that could have made your life easier from the start. Babywearing allowed me to eat, go to the bathroom, and clean up around the house while keeping Jack happy. But I always had to wait until he was either asleep (and do the paranoid mom checking the monitor every 30 seconds) or wait until Michael got home. And sometimes things got so busy I forgot to shower (more like I fell asleep before I could even think of it), that it could be days before I got the chance. Jack loved baths with me, but sometimes you need a good standing scrub to feel clean. Sometimes Michael would hold him in the shower, but it’s hard to shower and hold a baby (they get heavy after awhile!).
Hard to thread, slid down easily, choked me, and only instructions were for front facing.
A few months later I bought a water ring sling to use at my sister-in-law’s house. It got the job done but was not comfy at all. I used in the shower when I needed to (like when I remembered it’s been 3 days since I had a good shower), but never really loved it. It made Jack happy, so I decided to hold on to it. But I knew I was not going to use it with another baby. It would be back to dreaming of showers.
Fresh out of the box.
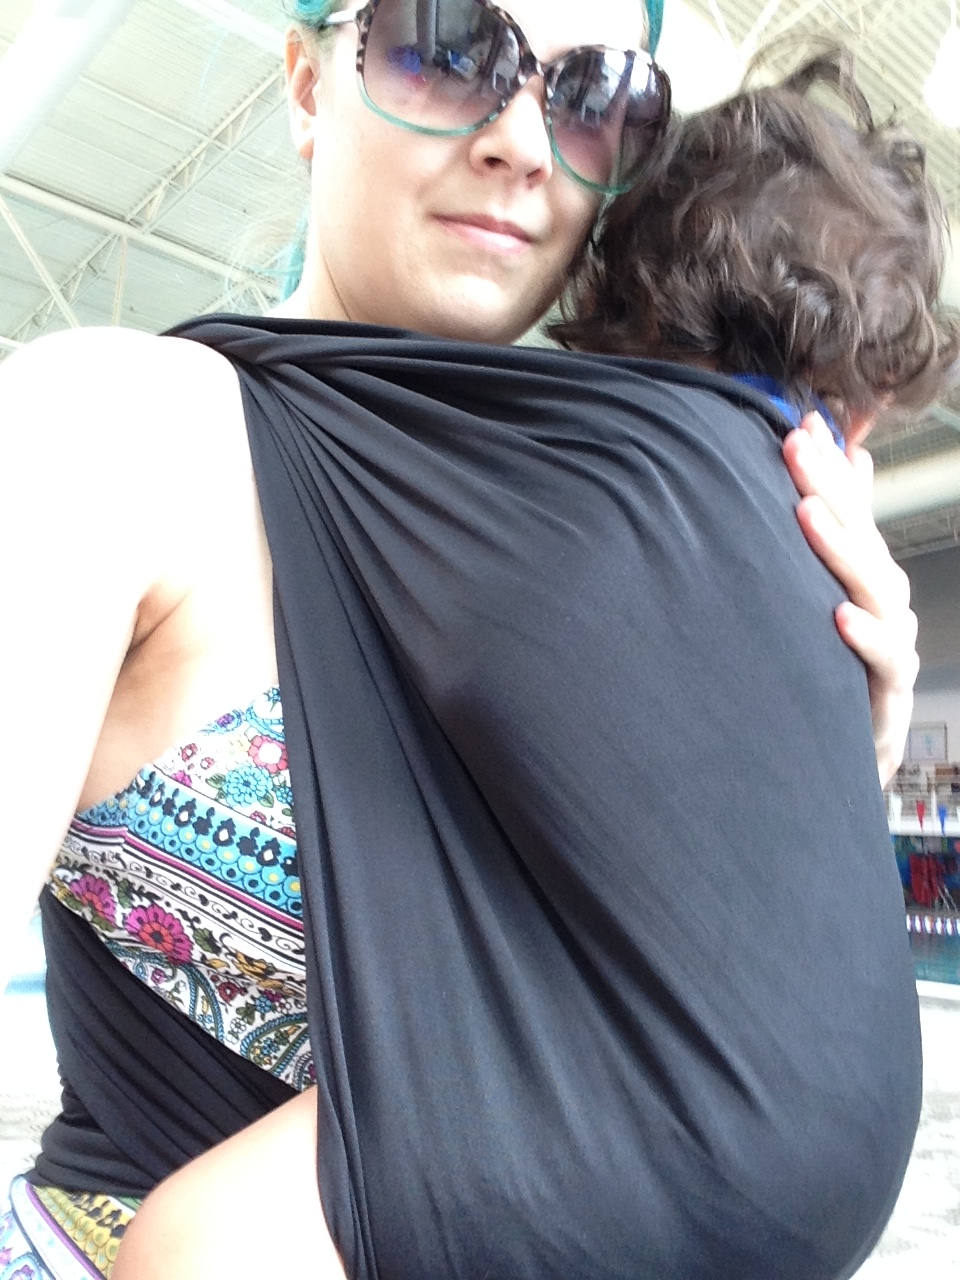
Then Lorene from Frogmama let me test out Wrapsody WrapDuo and everything changed. The night it arrived, Jack and I took tested it in the shower. It was a hit!
The most fun shower ever!
We tried a Front Wrap Cross Carry, one of Jack’s favorite carries. He was so happy! All secure and tight—I could never get that stupid ring sling tight so he was never this secure before. It was easy to nurse in to (because toddler logic says a shower is a great time to nurse….).
Happy husband to wear his son, grumpy baby ready for a nap.
A few days later I let Michael try it out at the local splash pad. Jack was grump and didn’t want to get wet. But Michael liked the wrap a lot. He liked that I could pre-tie it on him, pop Jack in and out as needed. He said it would have been nice to have used when Jack was a newborn in the shower (that’s when I facepalmed myself).
Jack is shocked at how supportive it is at the pool!
Then we tried it out at the pool and it was another big hit! Sadly, I forgot to check the open swim times and we only got to swim for a half an hour. But it was a savior in the showers afterward. Jack was furious we got out of the pool so early. I kept him in the wrap and rinsed us off quick and ran to the car with no fuss. It was very comfortable in a wet Robin’s Hip Carry while we got the chance though.
Pool time in FCC!
Lastly, we had a playdate with Myste, another Brand Ambassador, at a pool with a splash pad. It was a little chilly when we arrived but Jack wanted to check out the splash pad still. He stayed warm enough in the wrap close so my body that he was happy to play. Later we went into the pool, and Jack was still just as happy. This time we did a Front Cross Carry so I could pop him in and out as needed. And it was once again a life saver in the showers. Jack was upset playtime was over, but we got right into a warm shower and he calmed down.
Here are my final thoughts on the WrapDuo…
Not toddler worthy when dry unfortunately.
Cons:
The wrap is only suitable for front and hip carries since it is a stretchy wrap. This is a good thing because it not safe to have your baby in water and not be able to see them their head level in the water. Since this is a wet/dry wrap, it kind sucks you can’t use dry on the back. It would have been a lot easier to carry my bag and the wet towels to the car after the pool with him on my back.
It’s not toddler worthy out the water. The dry weight limit is 20 pounds, which means Jack at 22 pounds was technically too heavy. So when I was wrapping him before the we got in the shower first time, it was really hard to get him tight enough without popping his heat. And Michael said he felt like Jack could have just leaned back and fell out when he was walking to splash pad. I am sure this would not been an issue at all with a baby under the weight limit.
They take a while to dry. You know how your swimsuit can still be wet after hanging in the shower hours later? The wrap is made of similar material, so it also can be awhile before it it totally dry. Not a big deal, but it is more wet thing you have to shove back into your bag.
Even wet, it is small enough to fit in a small bag.
Pros:
It is easy to put on and take off. It’s light weight, glides nicely when tightening, but still makes a nice secure knot. No complicated rings to thread or buckles to snap. As long as you know the basics of wrapping, than you are set! And when Jack wanted out to play on the steps of the pool, I just pulled him right out with no fuss. Plus you can do all your favorite front and hip carries, so it is very versatile.
It is toddler worthy in the water. The wet weight limit is 30 pounds, which covers most kids well into toddlerhood. I never had issues tightening and securing Jack when the wrap was wet. It felt like any other good quality wrap. It did not dig or hurt in any way either.
Easy to store. It is very light weight and folds up small even when wet. It didn’t hog up space in the diaper bag or feel like I was carrying any extra weight. Nothing is worse than your diaper bag weighing more than your baby.
Overall, the WrapDuo is a great wrap. Like I said, I am facepalming myself for not knowing about it when Jack was still a clingy baby who never me set him down. I could have at least been nursing him for 30 minutes straight while I took a warm shower!
Thanks Frogmama for letting us testing it out! I so need one when I have another baby.


 The key to a successful ring sling with a toddler is good seat. Get a decent amount of fabric between your bodies, this makes it harder for them to pop the seat when they wiggle. Getting the fabric knee to knee will keep your toddler in a spread-squat position, keeping both your and them comfortable.


 Enjoy those toddler wrap snuggles while you can! They may act all big, but they are till your babies who need you once and awhile!
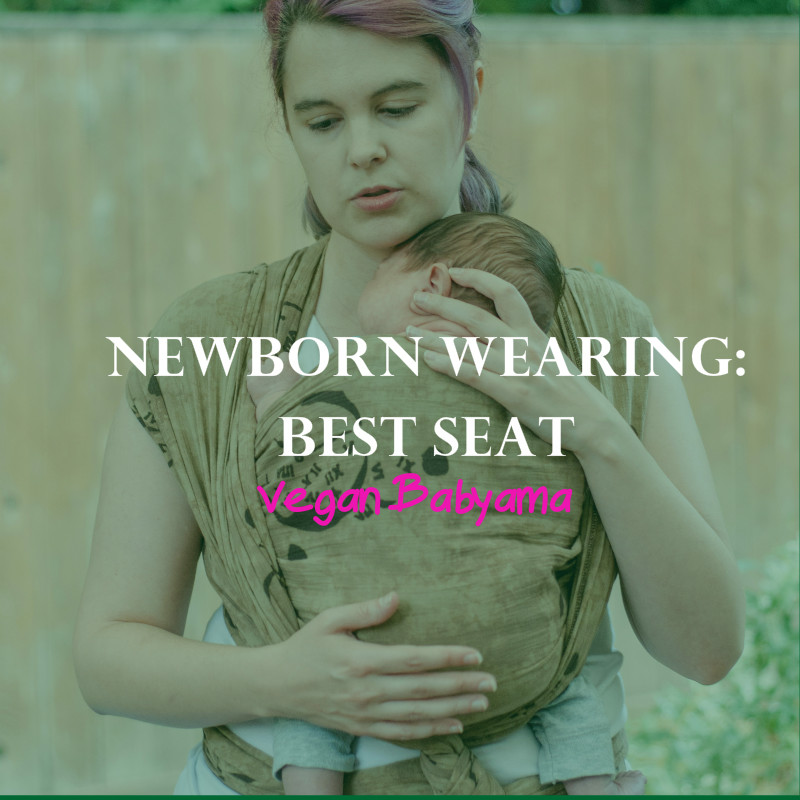

 Front Wrap Cross Carry Legs In. [

 Front Wrap Cross Carry with a Twist. [


 Location: