Can You Hike In It: Oscha Kasumi Orabel

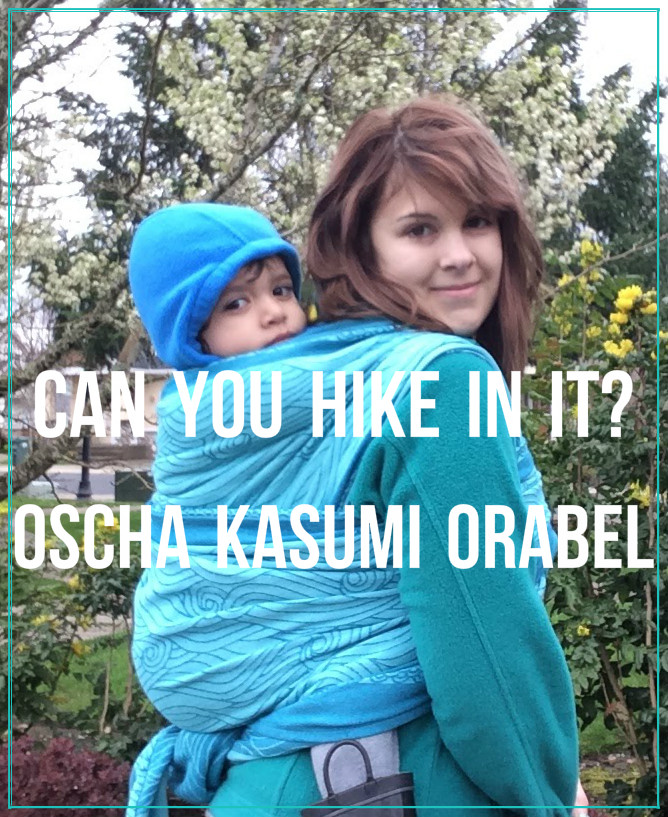
I was very excited to test out this Oscha prototype. It seemed like a great hiking carrier due to the wool/linen blend. I dreamt it would be soft, cushy but very supportive. I also have a love for Japanese culture, especially the art. This wrapped seemed right up my alley.

IMG_2492

Before I delve into the wrap or hike, I would like to address the issue of cultural appropriation. Oscha has been accused of cultural appropriation a few times, this pattern is one of them. The design is based on traditional Japanese woodblock carvings. There are several other wraps with the Kasumi pattern in other colors as well.  Some in the babywearing community felt Oscha, a Scottish-based company, had no grounds to use this pattern.

Although I have a deep love Japanese art, I am not Japanese or expert on Japanese culture. I am not going to pretend I really know much about preserving Japanese traditions. I do know that respect very important to the Japanese people, so I wanted to address this issues in my review. So I reached out to a fellow babywearer Maria Frank. She is of Japanese descent and happily embraces her heritage. I asked her how she felt about it personally. She did not feel this specific case was appropriation, and wondered if the people who were upset over this wrap were Japanese. In general, she said most Japanese feel flattered when they see Japanese influence in Western cultures.

“Traditional Japanese Art is dying. Especially wood block prints. There are not too many artists who really understand it. I honestly think that using Japanese influenced designs in good cause such as babywearing is super respectful!” -Maria

I understand that Maria does not speak for all Japanese, but I thought this was a very interesting perspective. It brings up the issues of when do we cross the line between appreciation and appropriation. In fact, this issue was a huge unit in my Media Ethics class in Journalism School. The general consensus is it usually alright take inspiration from other cultures—as long as you give credit where credit is due, consider the media you are using, and think about everyone you could offend (keeping in mind that there are some people you can never please). If you can’t do all these things, then maybe it’s best to not do it. For example, doing a secret photo essay of hidden tribe that believes cameras steal your soul and never give that tribe a dime is SO not okay. Oscha should have at least consulted a Japanese artist to design it (I have not heard this was the case) and some contribution back to Japanese Arts would have been the best course of action. Any time you borrow from another culture, you need to tread carefully. It’s wonderful to share ideas and create new customs, but it’s a whole other thing is steal something and claim it as your own. There have been far worse examples of cultural appropriation in babywearing recently though. As babywearing becomes more mainstream in North America, issues like this will continue to come up. I just hope in the future manufacturers will stay on the cultural appreciation side.

As for the actual wrap…..

IMG_2388

Manufacturer: Oscha Slings
Colorway: Kasumi Orabel
Color: Teal and cyan
Pattern: Waves
Size: Size 6
Materials: 45% extrafine wool,  20% organic linen, 35% organic cotton
Weave: Jacquard
Release date: N/A prototype

The colors are stunning in person. It was just as soft and buttery as I hoped when I pulled it out of the box. The day it arrived we had to pick-up my aunt from the airport, which can be overwhelming for a toddler. So, up Jack went into a Ruck. It made a nice deep seat, even with a bouncing toddler yelling “Auntie!” in my ear.

I had planned on taking the wrap for a walk through the Portland Japanese Garden (and possibly ask someone else for their opinion on the appropriation issue), but Oregon spring weather failed me. It wasn’t just a typical dreary day—it was POURING rain and only 38 degrees at 10 AM. Instead, it went on a trek to a park.

Location: 53rd Ave Community Park
Distance:  2.75 miles
Trail Type:  Paved concrete
Weather: Overcast and cold
Trail Conditions: Clear paths, busy park with lots of kids running around.

IMG_2476

We started out from the house in a Robin’s Hip Carry with a Ring Finish, one of my favorite carries. I really wanted to see how it wrap would thread and stay in a ring. A few other wool blends I tried took some work to a ring into place. But not this wrap, slid straight down like a dream.

IMG_2484

It stayed in place while I tightened the carry. It spread like butter across my shoulder and stayed comfy for a 25 minute walk around the park. Jack didn’t want to get down, even when he saw this favorite rocking pile (this kid loves to climb rocks).

IMG_2526On the way home, I did a Double Hammock with Freshwater Finish. The tails pulled through the torso pass easily and gripped nicely to keep the carry tight. Sadly no sleepy dust on the walk home, but I was so comfortable that I didn’t mind.

IMG_2515

Can you hike in a Oscha Kasumi Orabel? Yes, an enthusiastic yes! I was sad I needed to send this one on it’s way, I have no doubt it would be excellent on a big, long hike. The key feature this wrap is thread blend. The extrafine wool makes it supple, perfect for shoulder comfort without being itchy or thick. The linen keeps the wrap on the lighter/cooler side, perfect for a wide variety of conditions. The cotton give it the structure and support to last on long hikes. Oscha really picked the perfect blend ratio for a versatile hiking wrap for the Pacific Northwest. In fact, I am going to give this my first ever Favorite Hiking Carrier badge!

dsd


Advertisement

Edamame Wasabi Dip

IMG_5340You know when you are standing in the grocery store staring at all the options, and nothing really looks good? You pick up one thing, and think “Meh” or “I always get this…” That was me last week. I picked up my favorite brand of hummus and was like nah. Then I looked at the guacamole, and was still like nah…. I went through all the dips and wasn’t feeling any of them. So I walked away from the case sad, my dip-needs unfulfilled.

I walked down the freezer and randomly threw a bag of frozen edamame it in the cart. I like to put them in fried rice. Then when I was in the bean aisle, I saw chickpeas and thought about making my own hummus recipe. As I set the can in the cart, I saw the frozen bag. Then I randomly imagined a creamy but spicy edamame dip! So here we are with this post….

Edamame Wasabi DipIMG_5343
 16 oz bag frozen shelled edamame
 2 tbs tahini paste
 1 tbs red miso paste
 1 clove of garlic, minced
 1 tps ginger paste
 Wasabi powder, to taste
 Salt, to taste

Steam or microwave the frozen edamame until thawed and cooked. Let it cool to slightly above room temperature.

In a food processor, add the bag of edamame. Pulse a few times to get it started.

Then add all ingredients except the wasabi powder and salt. Blend until smooth.

Add the wasabi powder until desired hotness is reached. I don’t want to give you a set amount because everyone is different. But I would not go too much more than a 1/2 tsp if you like it mild. Likewise, I would not go over a 2 tbs if you like it hot. Just a bit, pulse and taste until you get to what you want.

Add salt as needed.

Spread into a serving dish, and top with a little extra wasabi and miso if you wish.

Let it sit for at least an hour, then enjoy!

IMG_5341

I suggest serving with some cucumber sticks, pita chips, and carrots.


Cold Soba Noodle Salad

I have no idea if I got this recipe from somewhere. Maybe I made it up! I don’t recall, but it’s similar to many other Asian noodle salads. But I’ve made it for years. It’s light but satisfying. Especially on a hot summer day (though it’s September and I really over this hot weather now). Very simple to make and tastes better the longer it sits, so make a big batch for leftovers.

Soba noodles are made from buckwheat, a grain that looks like a seed. It’s also gluten free so soba is great alternative to for those with a gluten allergy. Buckwheat is high in fiber and manganese, and is overall a very nutritious food. Soba noodles can be served cold like in this recipe, or hot like in a soup. I’ve tried them both ways, but I prefer cold.

This recipe makes 4 servings.

Cold Soba Noodle Salad
1 bag (12.8 oz) of Soba noodles
1/4 cup sesame oil
3 tbs soy sauce
1 tsp apple cider vinegar
1 clove of garlic, minced
1 tsp ginger, minced
1/4 tsp red pepper flakes
1 large cucumber, chopped
1 large red bell pepper, chopped
Other options:
1 large carrot, shredded
1 cup steam shelled edamame
1 block of extra firm tofu, drained and cubed
1 tbs toasted nori

Cook the soba noodles according the directions on the package. When done, drain well and rinse with cold water immediately. Set aside.

In a small bowl, mixed together the oil, soy sauce, vinegar, garlic, ginger and pepper flakes to make the dressing. Set aside.

Chop your veggies and add to a large bowl.

Add the soba noodles to the veggie bowl.

Add the dressing and mix together well.

Cover and refrigerate for at least an hour.

Top with some toasted nori and enjoy!

My favorite way to make this is adding all the optional ingredients, but that will have to wait until Jack’s older. I left my basic because I was sharing with my little son. We have started to introduce solids through baby-led weaning. I didn’t think he was quite ready for tofu or edamame yet.

Baby approved!

Coconut Noodle Soup

This is one of my simple go-to recipes when I want something easy and satisfying. My mom is coming to to help me before and after the baby comes, and I am so asking her to make me this for me. (and make freezer meals of this too). This soup is a mix between a milder Thai Tom Kha Kai and a simpler Japanese Ramen soup.

This recipe serves 4 entree sized portions.

Coconut  Noodle Soup
4 servings of ramen or soba noodles, cooked according to directions and set aside
Coconut oil
1 tbs minced ginger
2 cloves of garlic, minced
1/4 of a white onion, chopped
1 medium carrot or 8 baby carrots, chopped
1 yellow bell peppers, chopped
1 block of firm tofu, drained and cut into bit-sized cubes
4 cups low sodium vegetable broth
The juice of one lime
1-2 tbs soy sauce, depending on taste
1 can (12 oz) coconut milk
2 stalks lemongrass
1/4 tbs yellow Thai curry paste
Basil, cilantro, or chili oil for garnish

Heat a large pot over medium heat and add a little bit of the coconut oil.

Add the ginger, garlic, and onions. Saute for 2 minutes.

Add carrots, bell peppers, and tofu. Saute until the carrots are soft.

Add the vegetable broth, lime juice, and soy sauce. Bring to a boil.

Reduce to a low simmer. Add the coconut milk, lemon grass stalks and Thai curry paste. Simmer for 10 minutes, stirring occasionally.

Turn off the heat and add the cooked noodles.

Serve with a garnish of basil, cilantro, chili oil, or any combination of those. I normally do chili sauce and basil, but this time I left it plain.

As this cool, the noodles will absorb some of the broth and make the dish creamier. If you want it more broth, just add more water of vegetable broth during cooking.

Curry Ramen

Holy cow, I am 25 years old today! It feels like just yesterday I posted my recipe for the cupcakes I made for my birthday last year. I also can’t believe how much has changed in just a year! I graduated, moved to California, and am dating an amazing man who I am planning a happy life with. I am so grateful to finally have my (almost) adult life. Michael’s birthday was last Sunday, and since our birthdays are only five days apart, we had a joint party last Saturday. My past five birthdays have either been gone horrible wrong (try getting chased down the streets of Melbourne drunk by a British guy dressed as a ninja while you are wearing an alien costume) or just me. So it was very nice to celebrate with friends for once.

Thank you Mrs. Reddy for the lovely cake! 
So, for my birthday I decided to post a recipe for one of my favorite lazy weekend lunches: Curry Ramen. It’s a more adult version of the classic college staple. I have talked about how to jazz up your basic package of ramen before, but this is kicking it up several notches. It combines the goodness of a big bowl of noodles, the creaminess of curry broth, and you even get some nutrition from the vegetables. 
This recipe makes 2 servings but can easily be multiplied. 
Curry Ramen
4 cups water
1 clove of garlic, minced
1/2 tps of ginger, minced
2 packages of Oriental flavored ramen (make sure you get one that has no meat flavorings)
1/2 tbs curry powder
1/4 tbs cumin
1/4 tbs turmeric
1 cup frozen vegetables (I use peas, carrots and corn)
1 can coconut milk
1/2  block of extra firm tofu, drained and chopped into bite-size pieces
Salt and pepper, to taste
Cilantro, to taste
Mince the garlic and ginger.
In a large pot, add the water and the minced garlic and ginger. 
Cover and bring to a boil.
Remove the flavor packet from the ramen noodle package and add to the pot.
Add the curry powder, cumin, and turmeric.
Add the frozen veggies. Cook for a few minutes until no longer frozen. 
Add the noodles. Cook as long as the directions on the package indicate. 
Turn off the heat and add the coconut milk and tofu. Stir to combine. 
Season with salt and pepper to taste. 
Divide into two bowls and garnish with cilantro. 
Now enjoy your grown-up ramen—even if you are laying around in your pajamas watching TV like  a little kid I plan to do this weekend.

Beefless Gyoza

When I was grocery shopping a few weeks ago, I had forgot my list so I was just browsing aisles trying to remember what I needed. I saw gyoza wrappers, and even though they were so not on my list, I wanted them. Fried little dumplings dipped in salty soy sauce, yum!

Gyoza are Japanese pot stickers. What sets them apart from the Chinese version is they tend to be more garlicky and satly. Since those are pretty much two food groups in my diet, so I like them better.

I had also bought  Gardein Beefless Tips and thought they would be a lovely filling for half the batch, the other half were filled with frozen veggies.  I highly suggest all of Gardein’s products. My omnivore boyfriend even likes their stuff.

This recipes makes 16 dumplings, a nice entree for one or a side to share for two or three.

Vegetable and Beefless Gyoza
16 gyoza wrappers
Gardein Beefless Tips, thawed
1/2 cup frozen veggies (the standard carrots, peas and green beans works fine)
1 clove garlic, minced
soy sauce for dipping

In a small bowl, microwave the frozen veggies. Afterwards, add half the minced garlic and mix together.

In another bowl, add the thawed beefless tips and mix in the garlic.

Get a small bowl of water, which will be used to seal the dumplings.

Time to assemble…

Generously oil a skillet.

Take one gyoza wrapper and place it on a clean flat surface.

Either place one tablespoon of the veggie filling or one beefless tip in the middle. You might need to reshape the tip to fit properly, which is why I suggest you thaw them first so they are more pliable.

Then dip you finger in the water and make wet the edges of the wrapper throughly.

Now, there is a specific way to fold the gyoza, but if you are unfamiliar with the method, just close it up any way you can. Fold it half and seal or crimp the edges to make a half circle.

Now place it seal side up in the in oiled pan.

Repeat till all the gyoza are filled.

Now place the skillet on the stove and turn it to medium-high heat. Cook until the gyoza are golden brown on the bottom. Do not stir or move them.

Next pour in about 1/4 a cup of water and cover with a lid for the dumplings to steam all the wary through. They should be ready when all the water as evaporated.

To remove them, take the lid off and place a plate over the skillet. Flip it over and gently tap the bottom till they all pop out. 
Get yourself a little bowl of soy sauce to dip and enjoy! 

Udon Noodle Attempt

Awhile ago a posted a blog for sushi with a video link to a YouTube channel called Cooking With Dog. It’s weird that she cooks with a cute little dog, but she makes some interesting Japanese dishes. Most aren’t vegan and some are kinda complicated. But I was surprised to see that udon noodles were vegan and fairly simple.

I didn’t use the special kind of flour the video calls for and I only had a tiny big of starch so my noodles were not as soft as they should have been. Plus, I am not familiar with Japanese cooking techniques so they are no where near as pretty the dog lady’s noodles. That being said, they did taste like udon noodles and had the right outer texture. I was very happy with my first attempt.

Since I followed the video pretty closely, it would be silly re-type everything. So watch the video and look at the lovely photo sequence of my attempt.

As a good food blogger, I will actually post an original recipe too. This is a simple stir-fry I make often, just made it up one day with the random things I had in the fridge. It was a lovely accompaniment for the udon noodles.

Spinach and Tofu Stir-Fry
1/4 cup frozen or 1 cup fresh spinach
1/4 onion, diced
1 clove of garlic
1/4 of a block of firm tofu
1 tbs soy sauce
2 tps sesame seeds
1 tps red chili sauce

Heat some water or veggie broth in a skillet over medium heat.

Add spinach, onions, garlic, and tofu. Cook until the spinach is done (defrosted for frozen or wilted for fresh), and the tofu is heated through and lost most of its moisture.

Add the soy sauce and sesame seeds, cook for a minute or two more.

Remove from the heat and garnish with the chili sauce. Serve it over the udon noodles or whatever else you like.

Jazzed-up Ramen Noodles

Instant ramen noodles aren’t just for college students and don’t have to be so unhealthy. I don’t buy packaged foods often, but sometimes you just need a big bowl of steaming hot broth and noodles (and  at 75 cents a pop who can argue?). Try to find brands with lower sodium and no animal products. This means no chicken, beef, or seafood flavors. Vegan means no animal products and chicken flavoring usually implies it came from a chicken, so it’s not vegan. Stick to vegetable broths, the one I used was mushroom.

But the best way to counteract the evils of packaged foods? Throw some fresh stuff in there too! This is just one of many variations I make when I want to jazz up my ramen. I also suggest tofu, spinach, carrots, radishes, cabbage, edamame, jalapeños or any combination of these. 
Jazzed-up Ramen Noodles
1 package of instant ramen soup
2 cups water (may vary based on the brand you use)
1 1/4 inch piece of ginger root, sliced finely
1 clove of garlic, chopped finely
1 bunch bok choy
Fresh basil, chopped finely
Green onion, sliced finely 
Red pepper flakes 
Cook the noodles accordion to the instructions on the package. My package said to boil  2 cups of water, add the noodles and cook for 3 minutes. 
After about a minute of cooking, I added in the ginger and garlic. 
I suggest boiling the bok choy for a minute or two first so it is less bitter. 
Once the noodle are cooked, transfer to a serving bowl. 
Add the bok choy, and top with the basil, green onions, and pepper flakes. 
Relive or continue to survive your college days with cheap, easy, and delicious bowl of jazzed -up ramen. 

Brown Rice Sushi

If, hypothetically—not like that one of my friends ever did this—you are at a sushi restaurant that says each order comes with 6 to 8 pieces,  don’t assume you get to pick whether you want 6,7,or 8 pieces. Because, hypothetically still, if each of you order 6 of your choice of sushi (thinking that means 6 pieces only) and say you had 3 people eating, that means you get 18 orders of sushi. Eighteen orders of 6-piece sushi would be 108 pieces and will take up two large trays. And, if this ever actually happens, don’t be the friend who just sits there even though it sounds odd when the waiter repeats back 6 orders of sushi each. But, if this does happen, make sure one of your friends can take home the remaining 10 orders of sushi and be forced to eat them for the next few days. Not that my friends and I ever let this happen….hahahaha

Anyways, my friend reminded me of this (hypothetical) story today, so I thought I attempt to make sushi again. I have tried a few times before and failed horribly. So I watched some videos on Youtube first and figured out what I was doing wrong.
I did not take pictures as I was making the sushi because, to be honest, I did not have high hopes for myself. But they came out good. Follow the steps in this video just like I did and you should be successful. I used different ingredients then what she uses in the video because hers are not vegan. You can put in whatever fillings you like really, these were just what I have on hand. You can use traditional or get creative. Mine aren’t typical but not too crazy. I used brown rice instead of white because it is more nutritious. 
And I have no idea why the lady is cooking with her dog. At least the dog is cute! 
Brown Rice Sushi
2 cups cooked brown rice
3 tbs rice vinegar
2 tbs sugar 
1 tsp salt
2 sheets of toasted nori
Tofu, sliced into thin strips 
Dried shiitake mushrooms, rehydrated (I marinated them in soy sauce, garlic, and ginger too)
Handful of kale leafs
Follow the directions in the video (just minus the meat and non-vegan stuff), it explains it better than I can. It’s not that complicated, you just need the right technique. My recipe makes about two, 1 inch rolls. 
I wish I had some pickled ginger on the side, would have been the perfect finishing touch. I should have cut them a little smaller too. Oh well, next time. I am very proud of my first successful sushi meal.