Spaghetti Squash Baked Hash Browns

I love most vegetables, but I have never been a big fan of spaghetti squash. It’s just odd, a squash that breaks into little strings? Weird.  But I have been looking for more allergy-friendly recipes lately (I am getting really sick of brown rice, beans, and kale all the time). Spaghetti squash as on sale at the store, so I decided to try to veganize a recipe I saw on Pinterest, for hashbrowns.

I used VeganEggs and potato starch instead of eggs, and made it a baked dish so I didn’t have to stand around cooking (leaving a naughty toddler unattended doing God knows what).

I also made this a few days head of time and froze it all ready to go in the pan. Just heated the oven and watch cartoon with Jack until they were ready.

Spaghetti Squash Baked Hashbrowns  

 1 spaghetti squash
2 tbs Follow Your Heart VeganEggs
1/3 cup water
1 tbs Potato starch
1 tbs vegan butter, melted
1 tsp salt
1/2 tsp black pepper
2 tsp smoked paprika
1  tsp garlic powder
1 tsp onion powder

Pre-heat oven to 400 degrees

Prick holes in squash with a fork.

Place on a baking sheet and back for 45 minute. It will be soft to the touch when ready. Let aside to cool for 20 minutes.

Once cool, cut in half. Scoop out the seeds and discard.

Scoop out the squash strains with a fork, making sure the separate them.

Add squash to a large bowl. Add all remaining ingredients and mix together well.

Bake at 400 degrees for 20-25 minutes, until golden on top.


with blueberry perserves


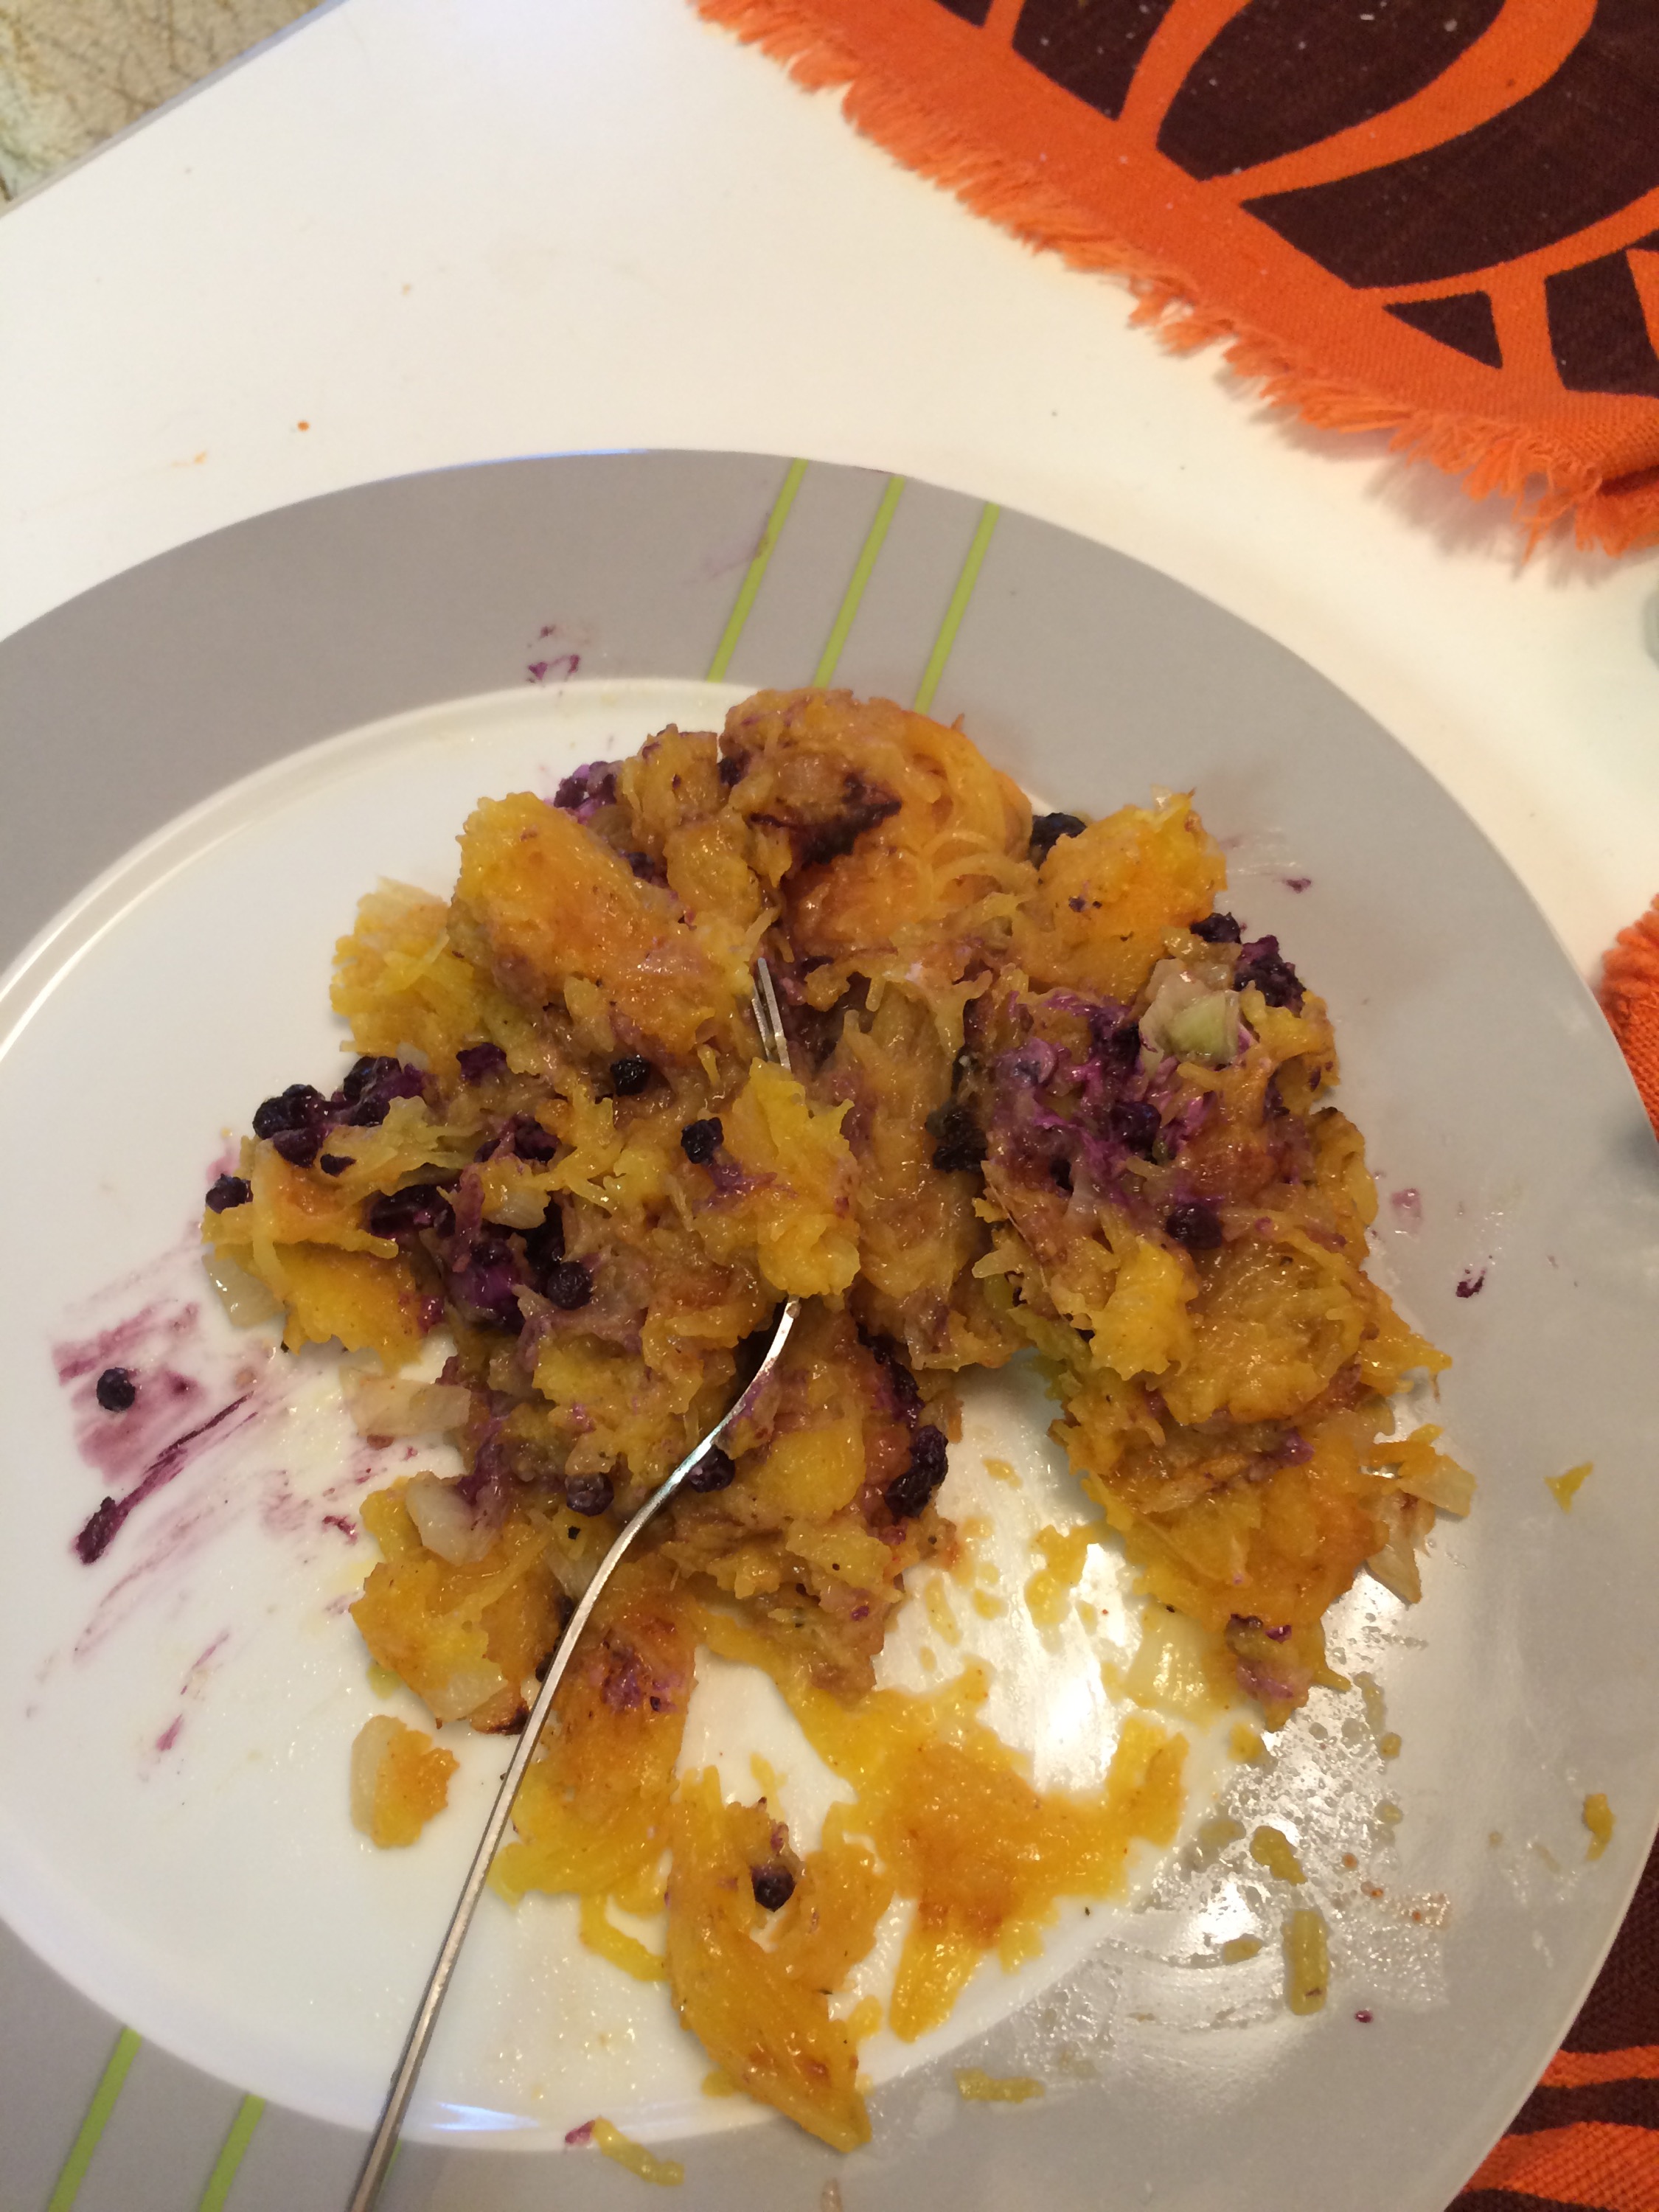
We enjoyed this for breakfast in the morning,  Michael could not get enough of it! But this would be  great for any meal….especially if you feel like using it as taco filling.  
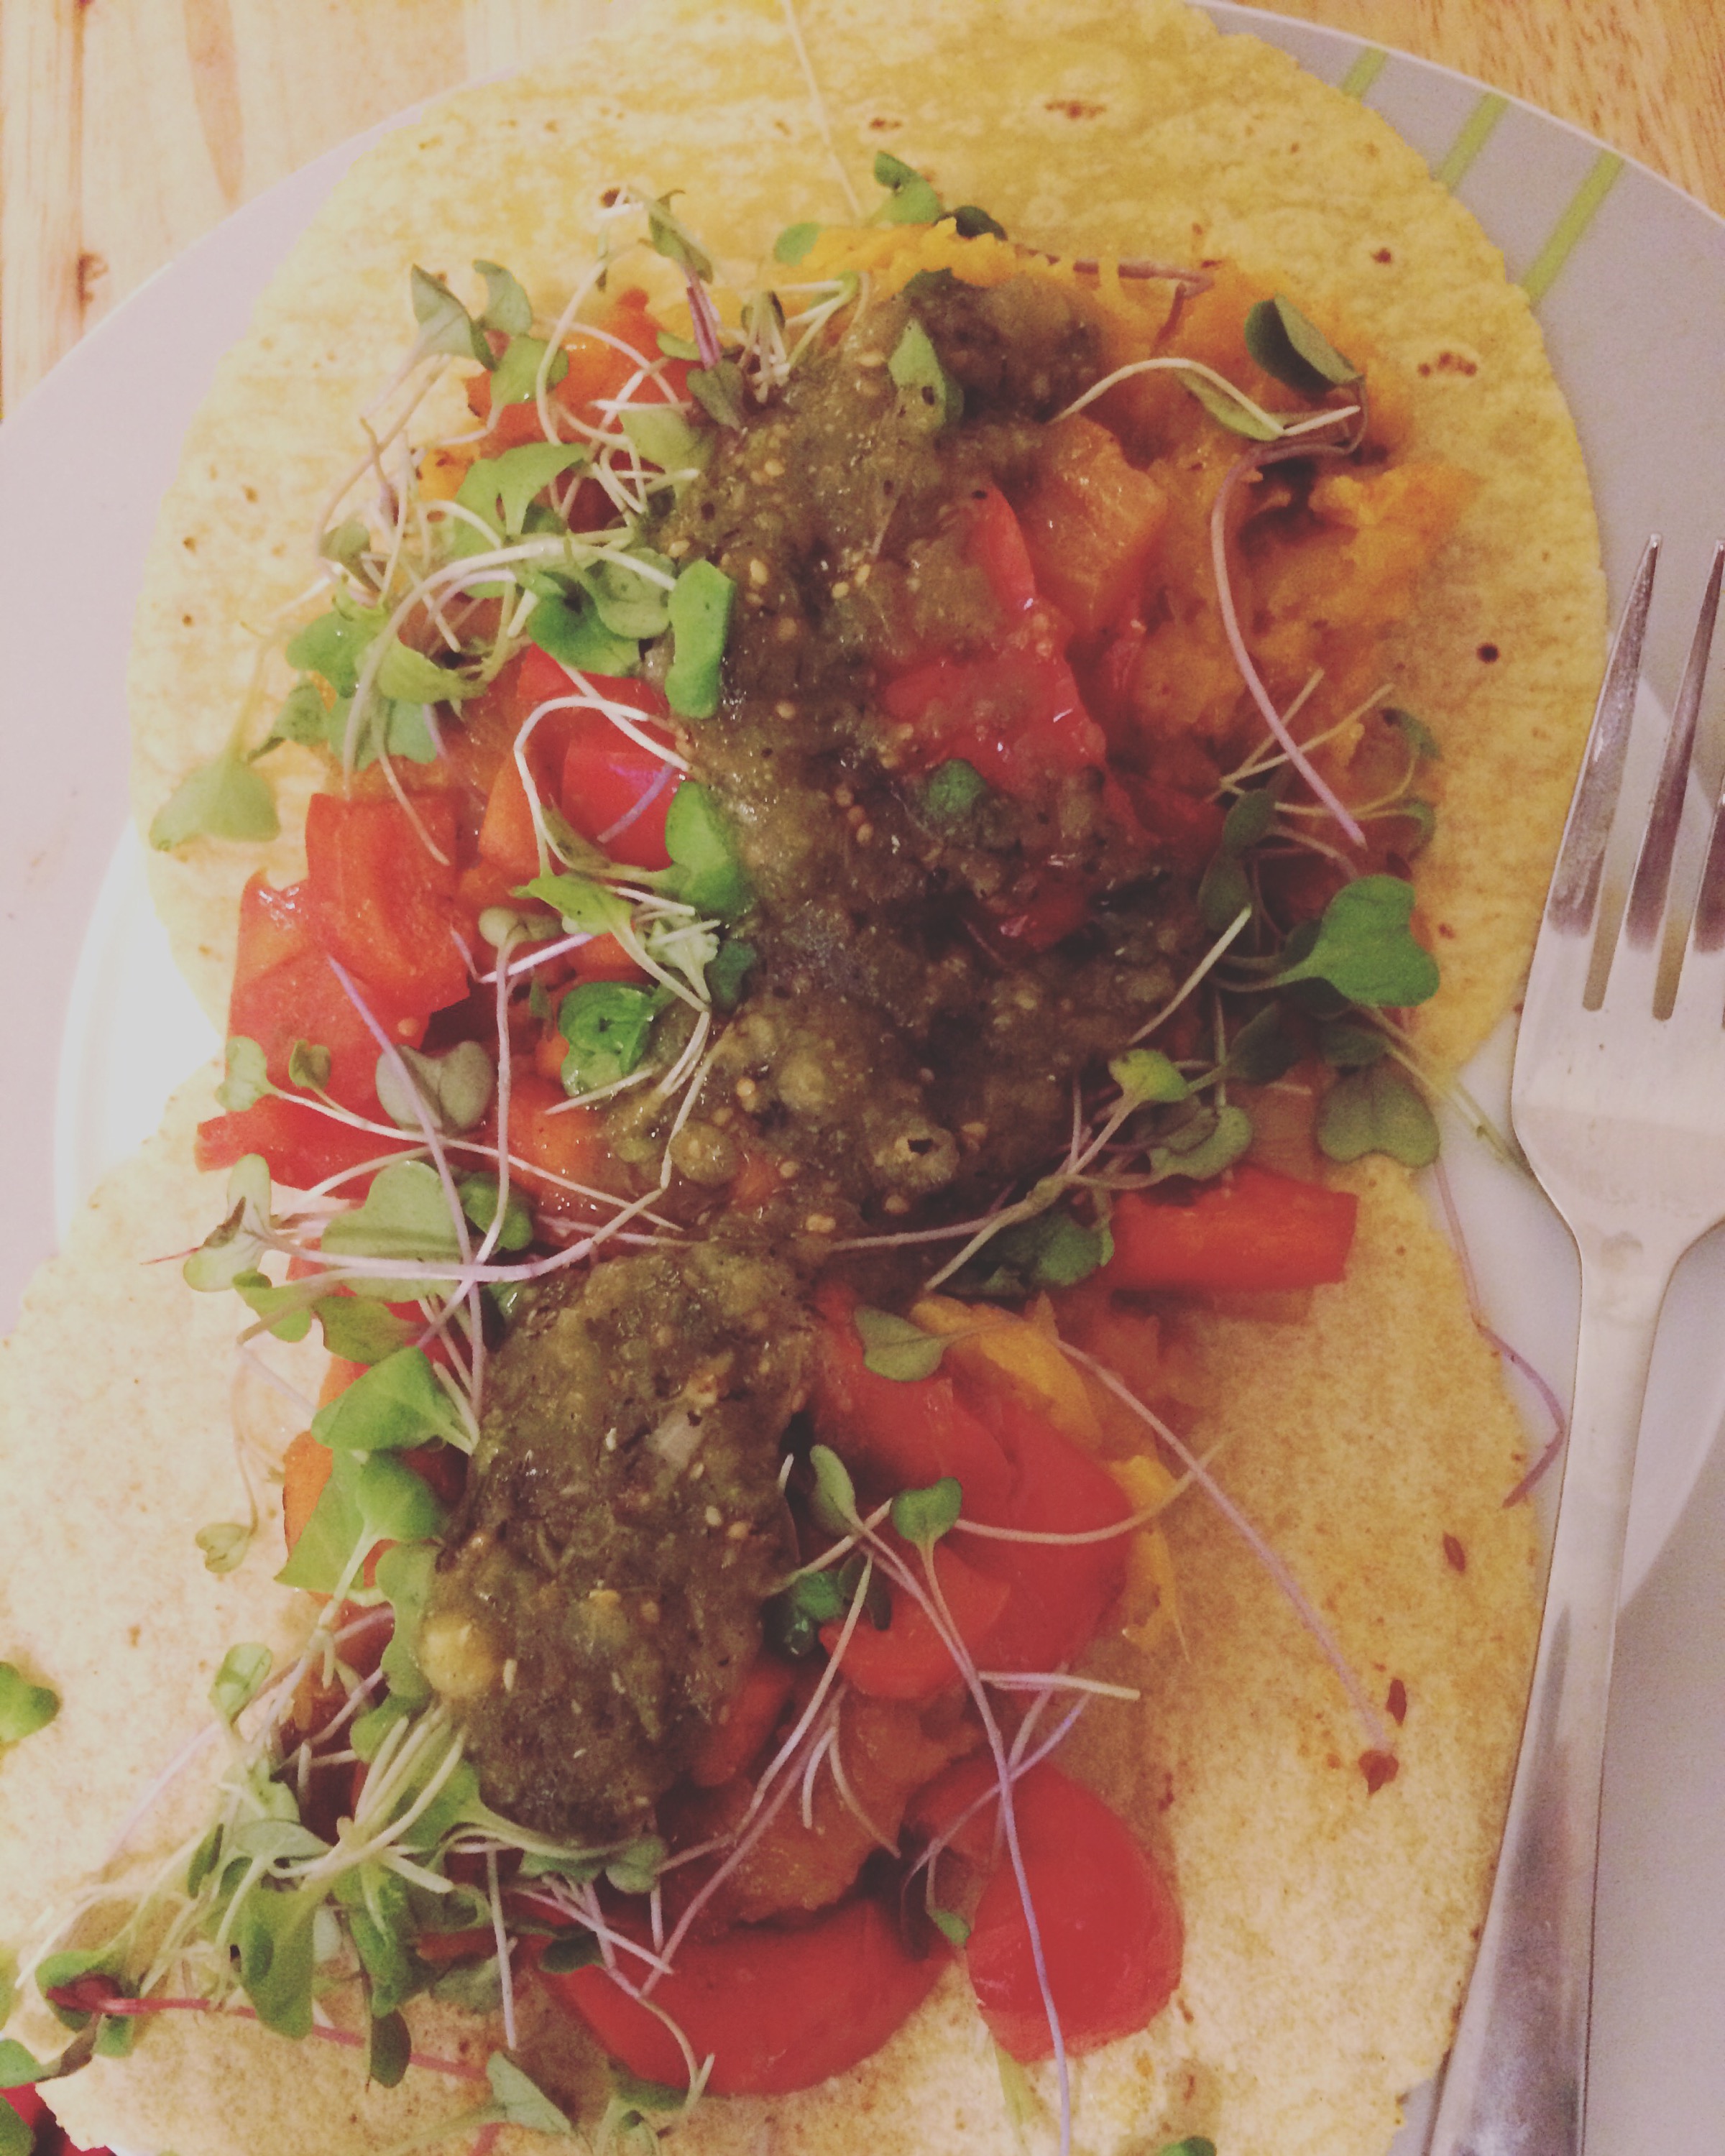
These were the best tacos ever! Just some corn tortillas, scoop of squash hashbrowns salsa, Daiya cheese, micro greens, and hot sauce. Make this, I promise you will not be disappointed!


Chocolate Mousse Parfait

IMG_3607

Happy (late) Mother’s Day! I hope you all had a day full of love and happiness! And I hope you called your mom!

We are finally all settled in Oregon (for now at least) and I can cook again! So I made my mom a little treat. She didn’t want a big fuss, but I love her so much that she deserves something special. I just made the recipe up. It’s similar to Chocolate Mouse I made before, but with a few more easy layers. It’s simple, no baking required, and full of protein!

 Chocolate Mousse ParfaitIMG_3608

  • 1/3 cup raw pecans
  • 1/3 cup raw walnuts
  • Coconut Oil (as needed)
  • Pinch of salt
  • Dash of cinnamon
  • 1/2 block of tofu (I used firm, but silken would be better), drained
  • 1 medium ripe banana
  • 1 cup chocolate chips, melted
  • 1 cup vanilla coconut yogurt

In a food processor, add the pecans and walnuts. Grind into crumbles that pack together. Add coconut oil as needed to get it to come together. Add a pinch of salt and cinnamon for flavor.

Press nut mixture into a pan like a crust. I used a medium Pyrex bowl so you could see the layers.

Rinse out the food processor and add the tofu and banana, blend together well.

To melt the chocolate chips, add them to a microwave safe bowl and microwave them for 45 seconds. Stir and the chips should melt. If not, put it back in for 15 seconds and stir again. Repeat as needed until they are all melted.

Add the melted chocolate to the food processor and blend well.

Pour the chocolate mixture over the nut crust and smooth the top out.

Spread the yogurt over the chocolate mixture evenly.

Lastly, garnish with some nuts, if desired.

Covered and let it set-up in the fridge for at least two hours.

Then scoop out and enjoy!

IMG_3615 (1)

It’s nothing fancy, but healthy and tasty. Make one for your momma today!


Cranberry Brussels Sprouts

This morning my husband accidentally woke the baby up early. And guess who had to get up with him? Anyways, I got to watch my favorite cooking show of all time, Good Eats. And the episode featured my favorite vegetable, Brussels Sprouts. I’ve seen the episode before, but kind of ignored it since I loved my sprout cut in half and pan fried. But today I paid attention and saw him make the most delicious looking dish ever. Shredded Brussels sprouts with dried cranberries and pecans. I had all those ingredients in my fridge and couldn’t decide what to make, this recipe was just what I needed! I made it vegan and added a few ingredients too. This dish would make a fantastic healthy side dish for the Thanksgiving!

Cranberry Brussels Sprouts
1 pound Brussels Sprouts
3 ounce raw pecans, chopped
1 tbs vegan butter (I used Earth Balance)
4 ounces dried cranberries
1/2 tbs extra virgin olive oil
1/2 cup panko bread crumbs
Salt and pepper to taste

Rinse the brussel sprouts and remove any brown leafs. Cut off the tip of the steam. Cut the brussel sprouts into shreds (or use a food processor like Alton did).

In a skillet over medium-high heat, lightly toast the chopped pecans. It will only take a minute or two. The color won’t change much but you will be able to smell the aroma. Remove from the pan and set aside.

In the same skillet, add the butter and brussels sprout shreds. Cook over medium heat for 5 minutes, until the sprouts soften.

Next add the cranberries and cook for one minute longer.

Transfer to a serving bowl. Add the olive oil and bread crumbs. Mix well.

Season with salt and pepper to taste.

Now dig into this delicious dish! Michael and I devoured the bowl. I even hoped Jack wouldn’t eat his  portion (I gave him just the sprouts, never give a baby nuts as they are a choking risk).  But he devoured his too! I will need to make this again soon, it was just so good!

Sweet and Tangy Baked Beans

These baked beans are incredible. No joke. And they happened to already be vegan! My mom always made baked beans this way when I was growing up. When I had just plain beans out the can at my friends’ houses, I would think why? why would you eat something so boring? Michael loves them too. I could make these everyday and he wouldn’t complain. I could go on and on, but please make them for yourself and see. 

This recipe makes 6 serving.

Baked Beans
55 oz can vegetarian baked beans 
8 oz can crushed pineapple in juice
1/2 white onion, finely chopped
1 clove garlic, minced
1/4 cup brown sugar
1/4 cup ketchup
1 tsp mustard powder 
Salt and Pepper, to taste as needed 
Pre-heat the oven to 375 degrees.
In a large bowl, combine all ingredients and mix well. Make sure you work in the mustard powder, painful to bite into a pocket of that stuff. 
Baked for 30 minutes, or until bubbly. 
It it cool slightly before serving and then enjoy! It’s a great summertime treat, I took a big tray (made 3 times the amount) to a family picnic. I love it with a juicy Tofurky Brat

Coconut Noodle Soup

This is one of my simple go-to recipes when I want something easy and satisfying. My mom is coming to to help me before and after the baby comes, and I am so asking her to make me this for me. (and make freezer meals of this too). This soup is a mix between a milder Thai Tom Kha Kai and a simpler Japanese Ramen soup.

This recipe serves 4 entree sized portions.

Coconut  Noodle Soup
4 servings of ramen or soba noodles, cooked according to directions and set aside
Coconut oil
1 tbs minced ginger
2 cloves of garlic, minced
1/4 of a white onion, chopped
1 medium carrot or 8 baby carrots, chopped
1 yellow bell peppers, chopped
1 block of firm tofu, drained and cut into bit-sized cubes
4 cups low sodium vegetable broth
The juice of one lime
1-2 tbs soy sauce, depending on taste
1 can (12 oz) coconut milk
2 stalks lemongrass
1/4 tbs yellow Thai curry paste
Basil, cilantro, or chili oil for garnish

Heat a large pot over medium heat and add a little bit of the coconut oil.

Add the ginger, garlic, and onions. Saute for 2 minutes.

Add carrots, bell peppers, and tofu. Saute until the carrots are soft.

Add the vegetable broth, lime juice, and soy sauce. Bring to a boil.

Reduce to a low simmer. Add the coconut milk, lemon grass stalks and Thai curry paste. Simmer for 10 minutes, stirring occasionally.

Turn off the heat and add the cooked noodles.

Serve with a garnish of basil, cilantro, chili oil, or any combination of those. I normally do chili sauce and basil, but this time I left it plain.

As this cool, the noodles will absorb some of the broth and make the dish creamier. If you want it more broth, just add more water of vegetable broth during cooking.

Potato and Leek Hash

I wanted a hot and tasty breakfast when I woke up this morning. Something filling, but not heavy. I had a few potatoes that needed to be eaten so I thought a hash was in order.

I got another organic vegetable box delivered the other day so I decided to add some veggies for more nutrition. The box came with two giant leeks. I think leeks are a seriously underrated food. They have the texture of a very soft celery mixed with a shallot. The flavor is like a mid onion and garlic. They are high in vitamin K and vitamin A. Like their cousin garlic, it also helps support the cardiovascular system. I love leeks because they provide that garlic/onion flavor, but with a bit more crunch.

This recipe makes one large serving (that is surprising low in calories!).

Potato and Leek Hash
1 medium russet potato, peeled and cubed
1/2 cup water
1/2 of a leek stalk (the lower, whiter part—I have a recipe for the leafy part coming up), sliced thin
1 small carrot, diced
1/2 of a broccoli stalk, peeled and diced
Salt and pepper, to taste.

Heat a skillet with a little oil (I used coconut) over medium heat.

Add the potatoes and cook until slightly golden on the outside.

Add water and cover. The steam will cook the inside of the potatoes. Stir occasionally so they do no burn.

Once the water is evaporated, remove the lid. Add all remaining veggies. Cook until the carrots and broccoli are soft, and the leeks are slightly golden.

Remove from the heat and season with salt and pepper to taste.

I served mine over some basic scrambled tofu with some hot sauce on top.

A healthy and easy breakfast, great way to start off my day of cleaning and laundry :-/

Apple Walnut Salad with Tofu

Part of my prenatal care includes a nutritionist, which I think all prenatal programs should have. An expert separate from your OB/GYN that just focuses on how you are eating and proper weight gain. As knowledgeable and beneficial my nutritionist is, I am kind of annoyed with her. I told her I was vegan—no animal products, honey, or eggs. Then we went over my diet. She said it was one of the healthiest she has seen in awhile. Then she went over my blood work. Again, is was amazing. And she had no complaints about my weight gain so far. Then she hits me, “I am sorry, but legally I need to classify you as nutritionally high risk.”

WHAT? High risk nutritionally? Because I chose to break from the standard American diet and not to eat meat loaded with fat and antibiotics? Or dairy loaded with hormones?

Then she reassured me that I am healthy and the baby is healthy, so all that matters. It’s just a legal term. Her only suggestion was I eat one more serving of leafy greens every day. So I have made this giant, veggie-packed salad for lunch most days now.

And yes, this salad has plain tofu. If you do not like the taste of plain tofu (I actually do), you can marinade and cooked it first. But honestly, with all the dressing and veggies, you don’t even notice the tofu.

Apple Walnut Salad with Tofu
3 cups leafy greens (any combination of dark lettuce, spinach, kale, arugula, etc.), washed and dried
1/4 cup carrots, chopped or shredded
1 Fuji apple, chopped
1/4 small red onion, chopped
1/4 cup raw walnuts, chopped
3 oz extra firm tofu,  drained and cubed
2 tbs Annie’s Lite Goddess Dressing
Cracked black pepper, to taste

In a big bowl, mix together all the ingredients. It’s that easy!

You can use any dressing you like, but Lite Goddess is amazing! This is just not for pregnancy, but make a great lunch for everybody. The nutrients of the dark green vegetables, vitamin C from the apples, vitamin A in the carrots, and healthy fat from the walnuts. I even suggest throwing in some avocado chunks too. High risk pregnancy my ass…

Huli Huli Seitan

Source

So….I was so busy and excited during my wedding luau that I forgot to take pictures of food….bad food blogger…

I made Huli Huli Chicken for the meat eaters and Huli Huli Seitan for the vegetarians. I chose Huli Huli because I wanted to give our guests something unique to Hawaii. And it’s easay.

Hul Huli “Chicken”

But I have made Huli Huli “Chicken” and seitan before on this blog. So I essentially combined the two for this recipe. It looks almost exactly like Seitan Ribs, just more sauce and in cutlets.

Seitan ribs

I put the seitan out during the party and just told the vegetarians what it was. Everyone else started eating it too. Some thought the texture was different, but my answer to that is “duh”. I’ve said this before, nothing will ever taste and feel exactly like meat, except meat! But everyone still ate it, despite their comments. So it must be pretty good 🙂

This recipe makes 20 servings. It can easily be cut down for a smaller crowd, but seitan keeps well in the fridge and freezer too.

Huli Huli Seitan
1 carton of vegetable broth
1 package Bob’s Red Mill Vital Wheat Gluten
2 and 2/3 cups water
1/4 cup soy sauce
3 gloves of garlic, minced
2 and 1/2 cups of ketchup
1 cup brown sugar
1 and 1/4 cup white wine vinegar
4 cloves minced garlic

In a large pot, add the carton of veggie broth and fill the pot up to 3/4 of the way full with water. Bring to a boil.

Meanwhile, in a large bowl add the vita wheat gluten, water, soy sauce and 3 cloves of minced garlic. Mix together until it forms a smooth and elastic dough. If you like, you can knead it together when it starts to get thicker.

Once the dough is ready,  divide into 20 smaller balls. Shape the balls into little cutlets. The dough is elastic so this might take awhile, you can let it rest if need be too.

Now drop the cutlets into boiling water and cook for 1 hour. They will puff up so give them a stir to resubmerge them occasionally.

Remove them from the pot and place in a large Tupperware container.

In a small bowl, combine all the remaining ingredients to make the sauce. Pour over the seitan, coating it well.

Seal up the container and  let it marinate in the fridge for at least 2 hours.

Now you can finish cooking it any way you want. I suggest throwing them on the grill until they get some nice grill lines. Or under the broiler just until they start to blacken. Or pan fry until nice and golden.

A lovely chicken substitute to remind you of the islands.

One Pot Pasta

I kept seeing all the pins on Pintrest for One Pot Pasta. Pretty much throw everything into one pot, let it cook for awhile, and you have prefect pasta in a light tomato sauce. Sounded too good not to try! There are a ton of variations of the recipe, but it appears that the “original recipe” (the one that made it popular) is from Martha Stewart. I kept it simple and pretty true to the originally. But I wanted it creamier, so I added some arrow root powder (or starch) to thicken it up without adding a lot of calories.

Arrow root powder is a natural thickener that comes from South America. It’s is similar to corn starch and can substitute for it. I like it better because it is finer and blends better (plus you know, the whole Monsanto King of the Corn thing…) You may notice in the photos that I used spaghetti and fettuccine. I had a half box of each and wanted to use them up. I am big believer is using what you have on hand in order to save money.  I also used organic cherry tomatoes from the veggie box delivery (they are so good, I could eat them by themselves!).

This recipe makes 4 servings.

One Pot Pasta
1/2 small white onion, sliced fine
1 small carton of cherry tomatoes, rinsed and greens removed
4 cloves of garlic, minced
4 sprigs of basil, leafs removed and roughly chopped
12 oz  (just shy of one box) of pasta
1 tps red chili flakes
5 cups of water
1 tbs olive oil
Salt and pepper, to taste
1 tbs Arrow Root Powder or Corn Starch

In a large, shallow pot, add all the ingredients except the olive oil, arrow root powder, salt, and pepper.

Cook for 5 minutes, just until the tomatoes bring to break. Add the olive oil, salt, and pepper.

Cook for another 5 minutes or so (it will vary based on the directions for the pasta), until  the pasta is cooked.
Remove from the heat. About about 1/4 cup of liquid will remain.

Add the arrow root powder and toss together well. The sauce will get slightly thicker and creamier.

Taste for seasoning, mine need a little more salt.

Now serve it up with some extra basil and enjoy!

A light sauce that is just a tad creamy without all the fat! Filling without being over the top. I am so going to make this again.

Peanut Butter Noodles

I cannot remember where I got this original recipe years ago. It seems like something from “healthy college living” magazine, but I know I made this while I was still in high school.  Oh well…

I make this often and it indeed came in handy in college. Cheap ingredients that are usually already in your pantry and very filling. However,  it can be high in calories so you need to keep your portions reasonable. But have no fear, it tastes even better the next day so no need to polish off the leftovers right away.

This recipe makes 4 servings.

Peanut Butter Noodles
8 oz. of spaghetti
1/2 cup peanut butter (creamy or crunchy, does not matter)
3 tbs rice wine vinegar
5 tbs soy sauce
2 tps fresh ginger, minced
1 clove of garlic, minced
Siracha, to taste
Water
1 medium cucumber, pealed, cut in half, and sliced
Chives, minced
Cilantro

Bring a large pot of water to boil. Then cook the spaghetti according to the package.

While that cooks, in a small bowl combine the peanut butter, vinegar, soy sauce, ginger, garlic, and Siracha. Add a little bit of water as need to help it come together. It should be smooth (unless you used chunky peanut butter) and slightly runny. It wont coat the noodles properly if it is too dry and clumpy.

Drain the spaghetti, reserving a cup of the water.

In a large bowl, add the spaghetti and the peanut sauce. Mix together well, adding a little of reserved pasta water as need to help it coat evenly.

Next add cucumber slices and chives, mix well.

Top with the cilantro and little more Siracha is you desire.

You can eat this warm or cold, and like I said,  it is better the next day when all the flavors settle in.