Vanilla Apple Pie

What does a nerd do when it is her day off and Pi Day? Make a Pie to celebrate!

Speaking of work, you may have noticed that I have not been posting as much lately. I got a new job, and it is great but very busy. I will get better about posting as I settle in more. Michael started a new job too, so I decided to make us both something special tonight for all our hard work.

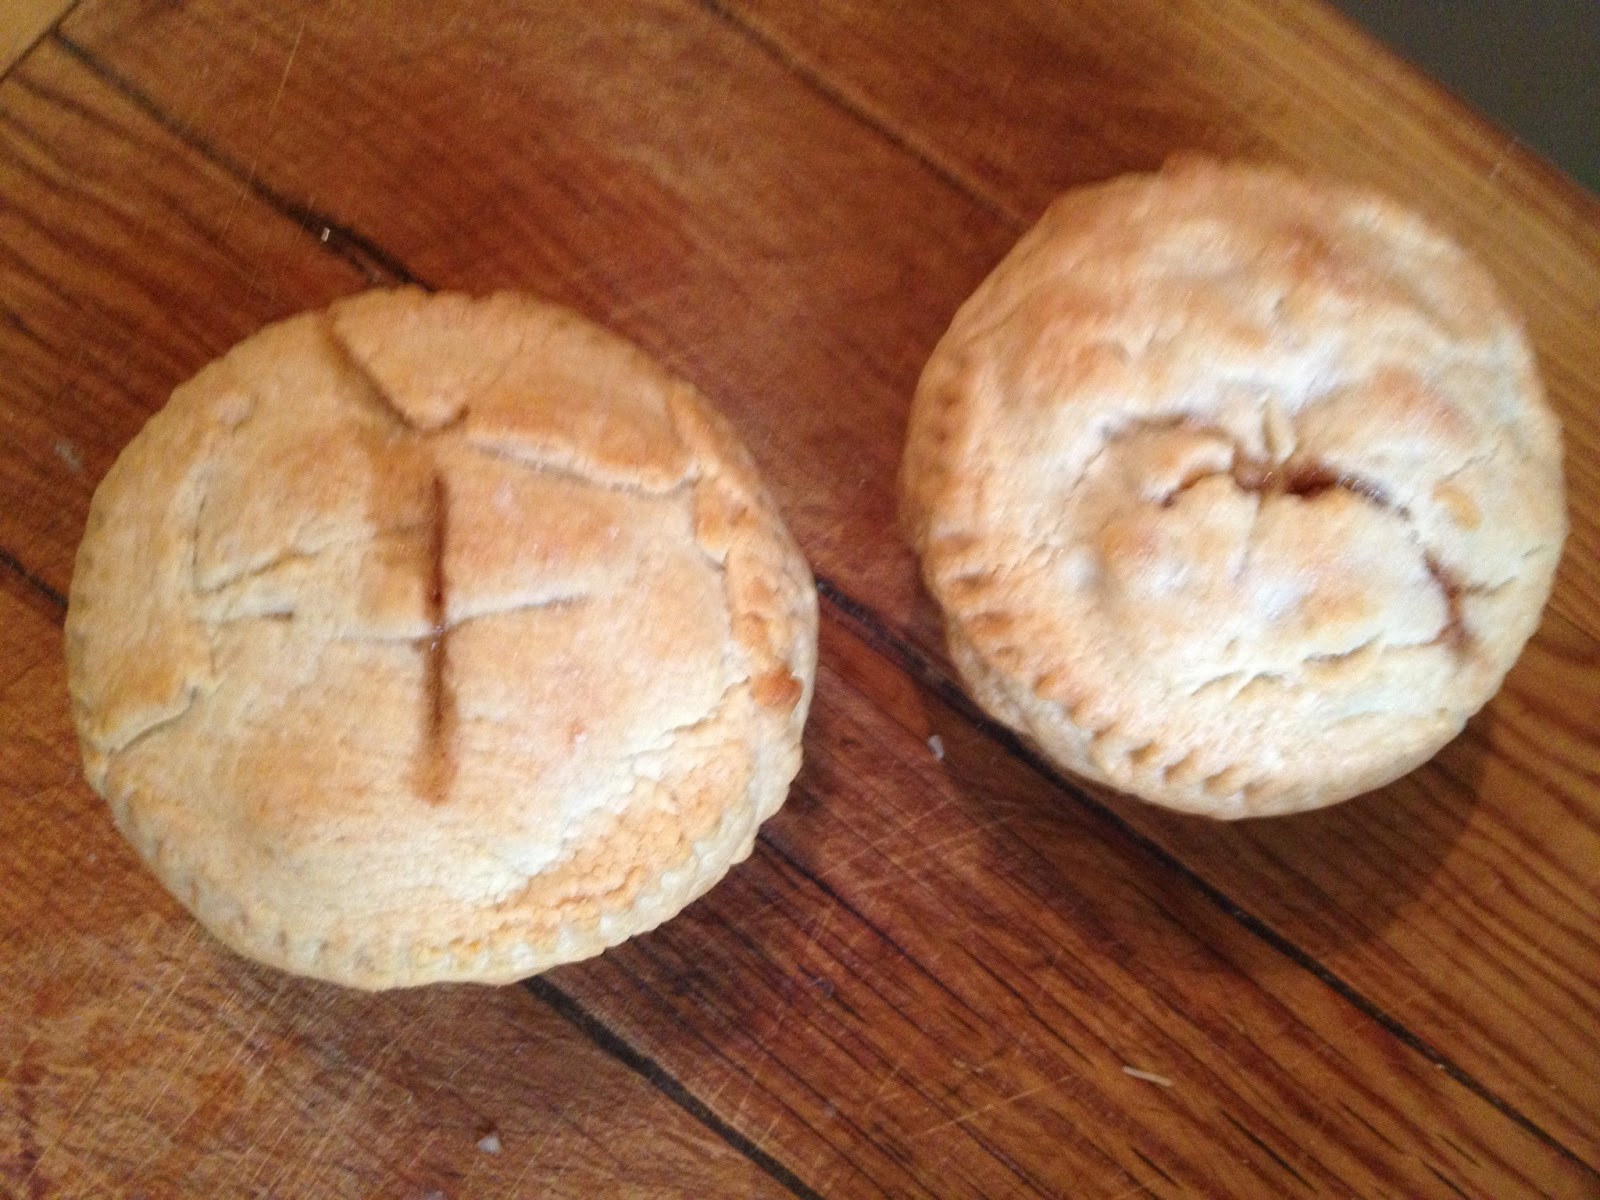
I thought a pie for Pi Day would be nice, but a giant pie for the two of us is just impractical. So I made two mini pies. Michael requested chocolate or apple pie, and I went with apple because it is easier to make.  My parents went on a trip to Mexico a few weeks ago, and my mom send me some Mexican vanilla extract, and I have been wanting to use it all week.  I thought it would be a nice addition to classic apple pie.

Vanilla Apple Pie
1 pie crust, frozen or homemade (I used frozen)
4 Fuji apples, pealed and cubed
1.5  tbs vanilla extract
1/4 cup sugar
1 teaspoon cinnamon
1 tbs cornstarch
Pinch of salt

If using frozen pie crust, let it thaw first.

Pre-heat the oven to 350 degrees.

Spray two small ramekins with cooking spray.

Roll out the pie crust on a well floured surface. Cut circles out of the pie crust that are a half inch larger than the radius of the ramekin. It’s okay if they are not perfectly round and there should be left over crust pieces.

Press the crust circles into the ramekins, reshaping them to fix it if need be. Make sure you press them in firmly and seal the edges as best you can.

In a small bowl, mix together the cubed apples, vanilla, sugar, cinnamon, cornstarch, and salt. Taste and adjust as necessary to your tastes.

Fill each ramekin with half of the mixture. They should be filled to the very full.

Take the remaining crust pieces and shape them into two circles large enough to cover the top of the ramekins with some overlap.

Now cover the ramekins with the pie crusts and seal the edges firmly. I crimped the edges with a fork to  make sure it seals properly and to make it look pretty.

Cut a small X on the top.

Sprinkle the crust with a little extra sugar.

Bake for 20 minutes, until the crust is golden and the filling starts to bubble up.

Let cool and enjoy a piece of 3.14159265….that’s as far as I know off the top of my head!

"Cheesy" Pasta with sliced "Hot Dogs"

I do not believe that majority of children are natural picky eaters. I believe it is parents themselves setting the bad example of not eating their veggies. Why would they want to eat something that their parents do not want to eat? And, of course it will be hard to break them of bad eating habits later. If they are used to eating fatty, oily, high carb foods, they will resist wanting anything else. So it is important to teach kids from an early age the importance of whole foods like fruits and veggies—-and eat them yourself to set the good example.

That being said, there is nothing wrong with making healthy versions of the things all humans are love: carbs, protein, and fat. All animals crave carbs because they fill you up, protein because it sustains you, and fat because it has calories to keep you going. But, we are evolved animals with big brains that we can use to make smart choices about our cravings.

This recipe is healthy version of a kid friendly dish, mac and cheese with sliced hot dogs. It uses soy cheese, vegan butter, and soy hot dogs. I used star stelline, a star shaped pasta, to make it more fun for kids.

This recipe makes 4 servings.

Cheesy Pasta with Hot Dogs Slices
8 oz stelline pasta (I used Barilla)
4 vegan hot dogs (I used Smart Dogs)
2 tbs vegan butter (I used Earth Balance)
1 cup vegan cheddar cheese (I used Daiya)
1 tsp dried parsley
Salt and pepper, to taste

Bring a large pot of water to boil.

Add the pasta and cooking according to the directions on the package.

While pasta cooks, heat the hot dogs. You can either microwave or pan fry them according to the directions on the package.

Cut the hot dogs into desired sized slices. Make sure you cut them small enough so your child does not choke. Check out this link for advice.

Once the pasta is cooked, drain and return to the pot.

Add butter and cheese. Mix together well.

Add the hot dog slices and parsley. Mix together well.

Season with salt and pepper to taste.

Quick and easy lunch that kids (and you) will love!

Krupnik: Polish Barley Soup

I mentioned before that I am predominately Polish and I learned about my heritage mostly from my amazing grandmother (see my Pierogi post). I am heartbroken to say she passed away this week. My family has another angel to watch over us all now. She died of atherosclerosis, hardening of the arteries to due to fatty build up. I originally went vegan after my uncle passed from a heart attack, vowing I would do everything I could to counteract my family health history. Now I know I will never go back to the standard American diet.  The best way I can honor her memory is to live a long healthy, happy life. I want to live to see my great-grand children. I will tell the stories my grandma told me about her mother’s life back in Poland, and teach them how to make delicous Polish dishes.

I heard my grandma mention barley soup before, but when she visited we usually made pierogi or kapusta. I have wanted to make this soup for awhile, mainly because it is already vegan friendly. This is popular dish is quintessential peasant food. There are various recipes with different vegetable variations. This is common version (and it happens to already be vegan). There are ones that have meat, but meat scrapes used to be hard to come by, so it was a treat on occasion only.

This recipe makes 4-6 servings.

Krupnik
Olive oil
1 large  yellow onion, chopped
2 cups porcini mushrooms, sliced
2 medium carrots, sliced
2 medium potatoes, diced
1 clove of garlic, minced
10 cups vegetable stock (a few cups can be water)
1 cup pearl barley
1 tsp dried parsley
1 bay leaf
1 tsp paprika
Salt and pepper, to taste

Heat some olive oil in a large pot over medium heat.

Add the onion, mushrooms, carrots, and potatoes. Cook until the onions are slightly translucent and the potatoes soften.

Add the garlic and cook for one more minute.

Add the vegetable stock.

Add the barley, parsley and the bay leaf. Mix together well.

Bring to boil, then reduce to a simmer.

Cover and cook for 1 hour, stir occasionally.

Once the barley is cooked, season with paprika, salt, and pepper.

I garnished it with a bit more paprika and some dill. I also had a side of pickled beats and kapusta I bought at a Slavic store.

I miss you so much already my beautiful babcia. Thank you for teaching about my heritage. I will always be a proud little Polish girl.

Mushroom Baked Potato

Happy Valentine’s Day!

This time last year, Michael and I had only been dating for a month, so I decided to go all out to impress my new boyfriend. I made him a big steak dinner—which is a GIANT deal for a vegan. But, like I have said before, I do make non-vegan meals for the people I love because, well I love them! So, of course this year Michael requested another steak dinner, and I obliged. The rest of the meal was vegan though, so I ate everything else—and had some yummy wine.

I made a healthier version of the classic baked potato. I added mushrooms, vegan cheese, and chives. There are tons of methods to speed up the cook time for baked potatoes, but I don’t like them. This basic way is not hard and they come out prefect. It does take time, but just throw them in while you make make the rest of dinner, pick up the house, or do whatever else you need to do.

This recipe makes 2 servings, but can be easily multiplied.

Mushroom  Baked Potato
2 large potatoes
1 tbs vegan butter (I used Earth Balance)
1/2 cup diced onions
2 cups sliced mushrooms
2 tsp season salt
1 tsp parsley
2 tbs Vegan Cheese (I used Trader Joe’s Vegan Mozzarella Style Shreds)
Chives, chopped

Pre-heat the oven 475 degrees.

Wash your potatoes well.  Pierce the potatoes with a fork several times all around.

Wrap the potatoes in foil, and put them in the oven.

Bake for 35-45 minutes, until a fork can be easily inserted into the center.

While they bake, melt the vegan butter in a skillet over medium-low heat.

Add the onions and cook until softened.

Add the mushrooms, cook until softened and slightly golden.

Add the season salt and parsley. Then set aside.

Once the potatoes are ready, remove from the foil and cut down the middle–but not all the way through.

Top your potato with the cheese, mushroom mixture, and chives—or anything else you like.

I added some garlic sautéed green beans and Michael wanted creamed corn. Simple and delicous meal, and no big hassle or mess. I have all evening to spend with my sweetheart now.

Lasagna Rolls Up

I kept seeing several versions of lasagna rolls ups on Pintrest so I thought I would give them a try. I like the portion control and that they not as messy as traditional lasagna. I decided to make a very simple version with just vegan cheese, kale, and spinach. I made my own pasta sauce, but jarred is just fine.

This recipe makes 6 servings.

Lasagna Roll Ups
1 box of lasagna noodles (oven-ready is fine)
4 cups pasta sauce  (Try my Mushroom Sauce)
1.5 cup vegan mozzarella cheese, divided into 1 cup and half a cup.  (I used Trader Joe’s Vegan Mozzarella Style Shreds)
1 cup kale (I put it in fresh but sauté would be fine too)
1 cup fresh basil

If you noodles have cooking directions, follow them. If you have no-boil kinda, just bring a large pot of water to boil and cook until al dente. Drain and let cool slightly—but do not leave in the colander too long, they will stick together.

Pre-heat the oven to 350 degrees.

Spread a thin layer of pasta sauce on a baking sheet or baking pan.

On a clean surface, separate the noodles and lie them down flat.

Evenly sprinkle about 2 tablespoons on mozzarella evenly over the upside of each noodle.

Next lay a few kale leaves down in an even thing layer over the noodle.

Next lay a few basil leaves down in an even thing layer on top of the kale.

Starting at one end of the noodle, tightly roll the noodle up. It should hold its rolled shape, if not squish it a bit until it stays.

Repeat the previous 4 steps with all the noodles.

Place the roll ups on the baking sheet. Space a bit apart from each other.

Cover the rolls ups with the remaining sauce.

Sprinkle the remaining half cup of mozzarella over the top.

Bake for 15 minutes, until the cheese is melted and slightly golden.

Michael loved these—though I made his with dairy cheese. I think next time I will load them up more, maybe some crumbled tofu and roasted peppers.

Almost Fat Free Hash Browns

Breakfast is one of the hardest meals to eat out for vegans. No eggs, bacon or sausage. Plus most places use milk and butter in their pancakes, waffles, bread & etc. We are usually stuck with two options, fruit or hash browns. It is important to ask if they use butter on the hash browns, and if they can leave it out if they do. Most of the time they might look at you funny, but will do it.

Luckily I love potatoes so I am content with a small order hash browns. However, they are not the healthiest thing in the world. They are usually fried or pan-fried in tons of oil. A few years ago I discovered if you use a good non-stick skillet and a bit of cooking spray that you can get them as crispy as restaurants without all the bad fat.

Every kitchen should have a good non-stick skillet, so I highly suggest investing in one. Like I mentioned before, Michael and I moved into his grandparents old house. I use the non-stick skillet that came with house, and for some reason I cannot find the name brand on it. It works great, so just goes to show you sometimes you don’t need to spend a lot of money for a quality product.

This recipe makes 2 servings.

Almost Fat Free Hash Browns
2 small russet potato
Salt and pepper, to taste
Cooking spray
Non-stick skillet (Must be non-stick)
1/4 cup water

Wash and peal the potatoes.

Grate the potatoes.

Pat dry with a paper towels. Try to get as much liquid out as possible.

Shape into a large, flat patty. I suggest doing this on a plate.

Spray the non-stick skillet cooking spray and heat over medium heat.

Once it is hot, place the potato patty in the skillet. If you used a plate, you can simply flip it over into the pan.

Add the water and cover quickly. Keep covered until the water is evaporated, usually when it stops sizzling.

Uncover and let it cook until it is golden on the bottom.

Carefully, flip the hash brown over.

Let it cook on the other side until golden too.

Season with more salt and pepper, or anything else you like! You can add condiments and make it the main dish. Or, you can serve it as side with some Tofu Scramble and soy bacon. I sautéed some bell peppers and onions, and added a few spoonfuls of salsa.

Potato Soup

Last week I had a bit of a cold so I wanted to make something soothing. And what could be more soothing that a big creamy bowl of potato soup?

This recipe makes 6 servings.

Potato Soup
1 tsp of vegan butter
1 small onion, chopped fine
6 medium potatoes, pealed and cut into small chunks
2 stalks of celery, chopped fine
1 clove of garlic, minced
1/4 cup flour
2 cup vegetable broth
2 cups soy milk
4 cups water
1 sprig of rosemary
1 sprig of sage
Salt and pepper, to taste

Heat the butter in a large pot over medium heat.

Once the butter melts, add the potatoes. Cook until softened slightly. You can add a little water if they stick to the pan too much.

Add the onions and celery. Cook until the onions are translucent and the celery has softened. The potatoes should be softer by now too.

Add the garlic and cook for a few minutes more.

Sprinkle in the flour and mix together well. Let the flour cook for a few minutes.

Pour in the vegetable broth, soy milk and water. Mix well.

Bring to a boil, then reduce to a simmer.

Take a potato masher and mash up the potatoes, while leaving some chunks for texture. The soup with thicken slightly as you do this.

Add the sage and rosemary sprigs.

Cook for 1-2 hours, until desired thickness is reached.

Remove the sprigs, some of the leaves will have fallen off.

Season with salt and pepper to taste.

I garnished with parsley.

Creamy, soothing and delicious!

Zombie Apocalypse Wheat Beer: Part 3

FRIDAY, JANUARY 25, 2013

Zombie Apocalypse Wheat Beer: Part 3

Finally! Last Saturday we tried our first batch of homebrew. If you haven’t yet, check out Part 1and Part 2 to read about the process of making it.

We cranked open a bottle to have with dinner. It is best to pour homebrews into a glass rather than drink out of the bottle. The yeast sediment settles to the bottom and can upset your stomach. Plus, you can enjoy the beer more out of glass. See the color and smell the aroma awhile you leisurely sip your tasty brew.
It smelled very banana-y like a hefeweizen should, so I was very happy. And, I was even happier when it tasted like a hefeweizen too! A little bit of spice, a little malty, and of course very banana-y. I was very pleased with the outcome. The only minor addition I would make a orange slice on top.
We have a batch of California IPA in the fermenter now, I hope it comes out as well as this one did. Once we start developing our own recipes or try a cool kit, I will post another homebrew story. Thanks Michael for my awesome Christmas present!

Tortilla Soup

One of the most popular dishes at the restaurant I work at is the Tortilla Soup. Unfortunately, it is made with chicken and chicken broth, so I have never tried it. On Saturday the cooks were making a giant batch of it and it smelled so good, so I decided to make my own version. No chicken obviously and I used vegetable broth. I added more vegetables too. Pretty easy to make and very filling. I used tortilla strips from my work, but you can make your own or use crushed tortilla chips.

This recipe makes 4-6 servings of soup.

Tortilla Soup
1/2 of a red onion
1 large carrot, grated
1 red bell pepper, sliced
1 green bell pepper, sliced
1 clove garlic, minced
32 oz vegetable broth
2 cups water
14.5 oz can roasted and crushed tomatoes
1 tsp Mexican oregano
1 tsp taco seasoning
1/2 tsp cumin
Salt and Pepper to taste
Tortilla strips (or crushed tortilla chips)
Cilantro or any other desired toppings

Heat some oil in a large pot over medium heat.

Add the onions, bell peppers, and grated carrot. Cook until the onions are golden.

Add the garlic and cook for a few more minutes.

Add the vegetable broth and water. Stir well.

Add the can of tomatoes. Stir well.

Add the oregano, taco seasoning, and cumin. Mix in well.

Bring to a boil, then reduce to a simmer. Cover and let it cook for 45 minutes. Stir occasionally.

Once it has thicken slightly, add the salt and pepper to taste.

In individual bowls, put a handful of tortilla strips.

Ladle the soup on top.

You can garnish with some cilantro and salsa like I did, or anything you like. Try some avocado, hot sauce, vegan sour cream & etc.

I was so happy to have this steaming hot bowl on such cold day (I thought California was supposed to be warm!).  I ate this a warm tortilla on the side too. Light but really hit the spot.

Zombie Apocalypse Wheat Beer: Part 2

As I stated in Part 1, the next step in my beer making adventure was to bottle the beer after fermentation. The two or so weeks we waited for it ferment we collected as many beer bottles as we could. This meant drinking a beer with dinner almost every night and asking our friends to save theirs for us. When I asked my boss if I could have the empties from work, he gave me the fabulous advice of using Pacifico bottles. He said to soak them in soapy water and the labels will peal right off. And they did! We also sanitized the bottles with the solution provided in the kit before  filling.

When I got back from Oregon I checked the specific gravity and it was perfect. I waited eagerly for Michael to come home so we could bottle it.

Smelled so good!

It smelled just like a hefeweizen the minute he took the lid off. I was so happy all our earlier issues did not ruin it.

However, just as I thought that, I made another mistake. The instructions say siphon the beer into the other fermenter then add corn sugar packet. I add the corn sugar packet first. It foamed up instantly and I realized I did it in the wrong order.

I quickly siphoned it into the other container.

It was still pretty foamy so I figured it was not that big a deal.

Still foamy, phew!

Next came the very messy part, the actual bottling. The second fermenter as a little spout on it so we just put it on the edge of the table and started filling. The spout sprayed everywhere at first and it took me a few bottles to get the hang of it. Once I got it down, it still took FOREVER to empty the fermenter.

It actually pours better if you hold the bottle farther from the spout.

As I filled, Michael capped the bottles. Our kit came with a nifty capper tool and bottle caps.

He complained that he only got to do the grunt work.

We probably lost about 2 beers due to the spout spraying. We put some towels on the ground underneath the spout to soak up the mess.

In the end we filled 47 normal bottles and 2 large bottles.

Ignore my messy living room…

The beer needs to carbonate in the bottles for 3 weeks. So Part 3 will be coming up soon.