Kava Kava

Source

Michael is half Fijian-Indian. His dad was born and raised in Fiji. Wanting to explore his islander roots was one of the reasons he went to UH Hilo (and met me!). So for our wedding reception luau, Michael requested I make a popular Fijian drink, kava. I wanted to make him happy, so I said yes…but being a little Polish white girl, I knew nothing about it. I had before in Hawaii, but I had no idea how to make it. So I did some research.

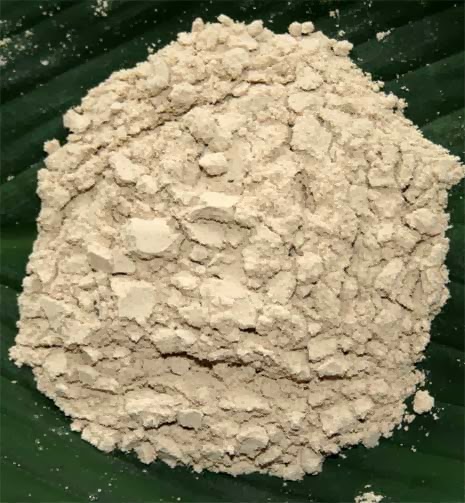
Kava is made from the ground up root powder of Pacific pepper trees and water. It is a social drink, normally drank with good company to create good memories. It is especially popular among young men, as a way to bond. It is notorious for sedative and slight hallucinogen qualities. It is not like you are gonna have an acid trip, but you will definitely feel more relaxed and open.

Then Michael sent me to a Kumar’s Island Market, a Polynesian store in San Jose. It was small, rundown looking building. It reminded me of almost every building in Hawaii, so I loved it. The store is really small, but if you want anything from the islands, this is the place. The guy was really nice and got me enough kava powder for the party.

Then I still have the problem of making it…and Michael had no idea because his dad never really taught him how. “It’s like making tea,” was my only clue from him. So I turned to YouTube! I found tons of videos on how to make it. This is video I based my recipe on:

This recipe makes 2 gallons, enough for 30 people.

Kava Kava
2 gallons of purified water
1/2 lbs kava root
1 large mesh or nylon strainer bag

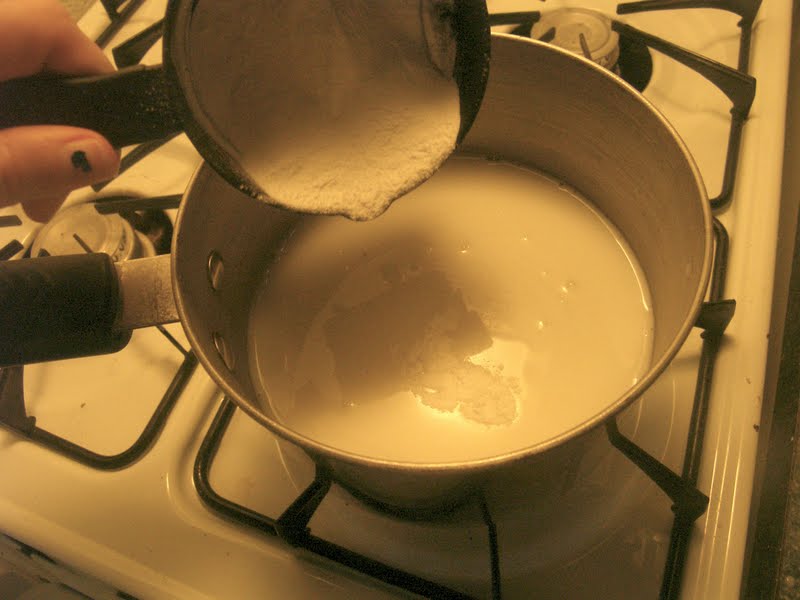
Bring all the water to boil. Turn off the heat.

Add the kava to the strainer bag. Do not tie the end yet.

Dip the strainer back into the water while still holding the open end (do not let go yet). Spoon some of the water into the bag to ensure all the powder gets wet.

Now tie the end of the bag and let it float. Cover with a lid and let it steep for 15 minutes.

Remove the lid and let it cool a bit.

Once it is cool enough, start ringing out the strainer bag into the pot. Once it dries out, dip in the water and ringing it out again. Repeat this 3-5 times.

At this point, I got Michael and had him taste it (did not think drinking a sedative was a good idea while pregnant). He said it was great so I served it. Traditionally kava is drank from coconut shells. We only had 6 of them, thinking everyone would not want to try it at once. We were wrong. All our guests wanted to do a big toast at the same time, so we had to pass out plastic cups.

Source

Everyone said the minute it hit their lips, their whole mouth went numb. And it continued to numb all the way down. Most were good with just one cup, but quite a few came back for more. I will have to wait until after the baby is born to try my version of kava. Good thing we still have half a pound of kava powder left! When I tried it in Hawaii, I remember thinking I needed to become one with my chair or else both of us would cease to exist…fun times 🙂

Kava is truly unique experience, highly suggest you try. Make a bowl and share with your loved ones.

BULA!

Huli Huli Seitan

Source

So….I was so busy and excited during my wedding luau that I forgot to take pictures of food….bad food blogger…

I made Huli Huli Chicken for the meat eaters and Huli Huli Seitan for the vegetarians. I chose Huli Huli because I wanted to give our guests something unique to Hawaii. And it’s easay.

Hul Huli “Chicken”

But I have made Huli Huli “Chicken” and seitan before on this blog. So I essentially combined the two for this recipe. It looks almost exactly like Seitan Ribs, just more sauce and in cutlets.

Seitan ribs

I put the seitan out during the party and just told the vegetarians what it was. Everyone else started eating it too. Some thought the texture was different, but my answer to that is “duh”. I’ve said this before, nothing will ever taste and feel exactly like meat, except meat! But everyone still ate it, despite their comments. So it must be pretty good 🙂

This recipe makes 20 servings. It can easily be cut down for a smaller crowd, but seitan keeps well in the fridge and freezer too.

Huli Huli Seitan
1 carton of vegetable broth
1 package Bob’s Red Mill Vital Wheat Gluten
2 and 2/3 cups water
1/4 cup soy sauce
3 gloves of garlic, minced
2 and 1/2 cups of ketchup
1 cup brown sugar
1 and 1/4 cup white wine vinegar
4 cloves minced garlic

In a large pot, add the carton of veggie broth and fill the pot up to 3/4 of the way full with water. Bring to a boil.

Meanwhile, in a large bowl add the vita wheat gluten, water, soy sauce and 3 cloves of minced garlic. Mix together until it forms a smooth and elastic dough. If you like, you can knead it together when it starts to get thicker.

Once the dough is ready,  divide into 20 smaller balls. Shape the balls into little cutlets. The dough is elastic so this might take awhile, you can let it rest if need be too.

Now drop the cutlets into boiling water and cook for 1 hour. They will puff up so give them a stir to resubmerge them occasionally.

Remove them from the pot and place in a large Tupperware container.

In a small bowl, combine all the remaining ingredients to make the sauce. Pour over the seitan, coating it well.

Seal up the container and  let it marinate in the fridge for at least 2 hours.

Now you can finish cooking it any way you want. I suggest throwing them on the grill until they get some nice grill lines. Or under the broiler just until they start to blacken. Or pan fry until nice and golden.

A lovely chicken substitute to remind you of the islands.

Hawaiian "Chicken"

I saw a version of Hawaiian Chicken in crockpot on Pintrest and loved the idea.  I never  saw something exactly like this anywhere in Hawaii, so I cannot say it is an authentic dish. However,  almost every party I went to had BBQ chicken or pork, fresh pineapple or other fruits, and plenty of rice.

I used soy strips instead of chicken, which does not need to cook very long, so I did not use a crockpot.  I used canned pineapple, but if you have fresh, use it.

This recipe makes 4 servings.

Hawaiian “Chicken”
1 tbs olive oil
1 red bell pepper, cut into strips
1 green bell pepper, cut into strips
1/2 medium onion, cut into strips
1 bag of Gardein Chick’n Strips, minus the sauce
1/2 cup Teriyaki sauce
1 tbs white vinegar
8 oz can of Pineapple chunks in 100% juice
2 tbs soy sauce
1 clove of garlic, minced
Cooked rice

Heat the olive oil in a pan over medium heat.

Once the pan is hot, add the chopped bell peppers and onion. Cook until tender.

Add the chick’n strips and heat through.

Add remaining ingredients (including the juice from the can of pienapples), except the rice. Cook until the sauce thickens slightly.

Serve over some rice and enjoy some (maybe not authentic) Aloha!

I miss Hawaii so much. I can’t wait until Michael and I can take a vacation back to the Big Island!

Huli Huli "Chicken"

Out past Pahoa is one of my favorite spots on the Big Island, the Ahalanui warm spring. It’s a natural geothermal pool that has been retained by a cement foundation and is refreshed with ocean waves. I love going there early before all the people arrive and swim a few laps in the nice warm water—just be warned there are little fish that will pester you every time you stop.

On the drive to the warm spring, I’d always past this sign for homemade huli huli chicken, and always wondered what it was. One time I finally Googled it and learned it essentially Hawaiian barbecue chicken.  Huli means turn in Hawaiian and it’s called “turn turn” chicken because it is traditionally cooked on a spit so it would turn and turn as it cooked over a fire.

But, I am vegan there is no real chicken and I am broke college kid so no spit fire roasting. Instead, I used seitan strips and cooked it in a skillet over a stove. I have made this several times before and finally decided to post the recipe.

This makes 2 servings.

Huli Huli “Chicken”
2 servings of vegan chicken (any form is fine, I used strips)
1/4 cup ketchup
4 tbs soy sauce
1/4 cup brown sugar
2 tbs white wine vinegar
1 1/2 inch piece of ginger, minced
2 cloves of garlic, minced

In a large bowl, mix together all the ingredients, except the fake chicken.

Now at the chicken and it it marinade for at least a half an hour.

Heat a large skillet over medium-high heat.

Add the marinaded fake chicken and the sauce. Cook until the fake meat is heated and the sauce has thickened.

I served mine with cole slaw and rice. Tangy, sweet, and totally worth trying. I think Hawaiian barbecue is my favorite style.

Beer Crust Hawaiian Pizza

After about a month of conflicting schedules, my friends Rick and Kyla finally made it over from Kona to come visit me. It was nice to seem them and nice to have someone to cook for for once.

Awhile ago I saw a recipe for a pizza beer pizza crust. I can’t remember where I found it, but it was called something like “lazy single guy pizza crust” and that is essentially what it is. Just dump a some beer into flour and there you go. I was curious and decided to give it a try. The recipe claimed it would rise a little bit after 10 minutes, but it lied. It was still good though. It tasted just like a normal dough recipe, yeasty favor and all. It was a a little denser and chewier, but no big deal if you like thick crust.  Overall I liked it and it was definitely easy to make. I used Long Board from Kona Brewing Company because it’s awesome and thought it would be nice to use something local.

I made one Hawaiian pizza, topped with fresh pineapple that Rick brought and vegan ham from Yves (the store was out of vegan Canadian bacon but it’s same thing really), and one veggie with my usual toppings so refer to my Veggie Pizza post for those.

Both were cheese-less but topped with hummus instead. And, I am finally including my hummus recipe in this post. And yeah, I know traditional hummus has tahini and other fancy stuff, but this basic recipe is still good and easy to make (how many people really keep tahini in the house on a regular basis, let alone a single college girl?) And, I used a store-bought sauce this time because I had some on hand.

Easy Hummus (makes enough for 2 pizzas plus extra):
2 cans garbanzo beans, drained and rinsed
2 tbs olive oil
1 tbs Ener-g Egg Replacer
Red pepper flakes, to taste
Pinch of salt and pepper
1/2-1 cup water, ass needed


Beer Pizza Crust (makes 2 pizzas):
4 cups all purpose flour
22 fl. oz. of bottle of beer
1 tbs olive oil
1 tbs salt

Hawaiian Pizza:
1 beer crust, unbaked
3/4 cup hummus
1/2 cup tomato sauce
Vegan Canadian bacon (Try Yves), chopped
1/2 cup pineapple, chopped

For the hummus, throw everything into the blender and blend until smooth. I suggest adding the water in slowly as needed to help it come together so it doesn’t get too runny.

It may not be traditional, but tastes just as good to me.

The crust is just as easy. Pre-heat the oven to 500 degree Fahrenheit.

In a large bowl, add the flour. Next add the oil and salt. Then pour in the beer slowly. Add a little bit at a time and mix well before adding more. Depending on climate, you may need more or less. I actually needed a little less then the whole bottle. It is ready when it’s slightly tacky but moist.

Since it doesn’t need to rise, it’s time to knead. Sprinkle some flour on a clean surface and knead gently. Don’t over work it, just till it’s smooth and workable. Roll the dough into the shape of pizza pan. Transfer to your pan and shape to fit. If it tears, just mold it back together.

Time to top. Spread the hummus on in an even thick layer.

Spread the tomato sauce on top.

Then finally top it with the Canadian bacon and pineapple.

Bake for 15-20 minutes, until the crust is all golden and crunchy.

It was so nice to share lovely vegan food with lovely friends! Thanks for coming guys!

Haupia, Coconut Pudding

Picture from here

Sometimes I browse the bakery section at normal grocery stores to see how horrible those innocent looking treats really are to remind myself why I am vegan. I know that sounds weird, but I wish everyone would do this just once. Take the time to actually read the ingredients in those doughnuts or cakes, and you will probably never want to eat them again. But one day I came across something I had never seen before. It was a small little white square covered with shredded coconut. It had only a few simple ingredients, was fairly low in fat and calories, and was made at a local bakery. And it was vegan. I bought the little white square and surprised when I bit into it. It was squishy like gelatin, but sweet and coconutty. I am not a fan of gummy or jelly things, but I love coconut so I was torn on whether I liked the treat or not. And to be honest, I am still torn. Yet, this is the second time I have made this dessert at home.

Haupia is a technically coconut pudding made from starch and coconut milk, but has the texture of gelatin. Gelatin is not vegan (ever heard the saying “take the horse to the glue factory”?) so I was kind of skeptical that the haupia square at the store was labeled properly. But my skepticism was set aside when my homemade version was just as gelatinous.

I can’t find much information on the history of haupia besides it became popular after World War II and was originally made with arrowroot starch. It is easy to make but requires your full attention while cooking. This recipe is based on two fairly similar recipes, one from a luau recipe website and one from Food.com. Both recipes call for cornstarch, which I don’t use that often so I usually don’t keep in the cupboard.  I was about to cave and buy some when I realized that Enger-G Egg Replacer, which I usually have on hand because it is so versatile, is made from starch. So I gave it a shot and it worked just fine.

A side note about canned coconut milk I mentioned in my Yellow Curry post: light coconut milk is a waste of money.  It is just watered down normal coconut milk and usually costs more. Save the money and just add water yourself if you want cut down on calories.

Haupia
1 and 1/2 cans coconut milk
1/2 cup water
1/2 cup sugar
1/2 cup Enger-G Egg Replacer or cornstarch
1/2 cup shredded coconut
1/2 teaspoon vanilla extract
pinch of salt


In a small sauce pan, heat the coconut milk, water, and sugar over medium heat while continuously whisking.

When it is about to boil, gradually add the egg replacer or starch and continue to whisk.

When it starts to thicken slightly, add the vanilla, salt, and shredded coconut flakes and continue to whisk.

Remove from the heat when it is smooth but as thick as pudding.

Pour into desired dish and chill for at least two hours so it can fully set up. Here is a little advice on what shape of dish to use. The first time I made this, I tried to replicate the one I got from the store so I used a square pan so it would be just as thick. But the pan was too small so it came out really thick. Since I don’t like squishy/gelatin things, I used a sheet pan this time so it would be thinner. But it was too thin and did not come out of the pan very nicely. So, I next time I make this I am going to use medium-sized square pan, and shoot for around 1/2 inch thickness.

Since they did not come out of the pan in a decent looking form, I didn’t take any final pictures. But I promise they were yummy, if you like squishy things that is. I topped mine with some additional shredded coconut too, it helped cut down on the squishyness.

Hawaiian Mac Salad

When you order a Hawaiian plate lunch, you can be certain of two things: large portions and macaroni salad. They usually aren’t vegan so I have to order all rice instead.  But to keep up with my Hawaiian post trend, I thought I should make my own version. There isn’t anything that makes this dish unique to Hawaii besides the fact it’s very popular here. It’s pretty much the same recipe you mom makes for picnics. I kept everything traditional, the only difference is I used Veganaise instead of mayonnaise.


Mac Salad
2 cups large elbow macaroni, dry
1/4 cup carrots, grated
1/4 cup celery, finely chopped
1 cup Veganaise
1 tbs sweet relish
Salt and pepper to taste

Bring a large pot of water to boil on the stove. Cook the macaroni according to the directions on the package.  Drain and set aside.


Broke college kid doesn’t have a grater, so I chopped my carrots

Grate the carrots and chop the celery.


The glass bowl makes it look like it’s sitting on the counter.

In a large bowl, add the macaroni, carrots and celery. Add the Veganaise and relish then mix together. Season with salt and pepper to taste.


Veganaise is the best thing ever. Way better than dairy mayo.

Cover and chill in the fridge for at least 2 hours. This gives the macaroni time to absorb all the flavors.

I ate mine on it’s own, but it’s a fabulous side dish for any entree…man, now I wish I made some BBQ tofu to go with this.

Pineapple Fried Rice

What could be more Hawaiian than pineapple? To learn about the history of pineapple in Hawaii, visit the Dole website, they explain it better than I can. FYI,  the maze at the plantation on Oahu is hard.

Pineapple is very sweet and juicy. I have to admit that I don’t like them on their own, too sweet for my taste. But I love them for cooking and baking because they pretty much eliminate the need for any additional sweeteners.

They have been used as an anti-inflammatory since ancient times and have lot of vitamin C. They are also a great source of manganese and thiamin. It also has an enzyme that aids digestion so it is good after a heavy meal.

However, this fried rice dish isn’t heavy at all. It is a nice balance between sweet and savory. I used canned pineapples because I hate peeling and coring whole ones. When buying canned fruit, make sure it is stored in 100% juice, not syrup. No one needs extra sugar water. I also used edamame (whole soy beans) instead of peas because it gives it more texture.


Pineapple Fried Rice
2 cups cooked brown rice
Sesame oil
1/2 block of firm tofu, drained
1/2 cup onion
1 clove garlic
1/4 inch of fresh ginger
2 medium carrots
1/2 cup edamame, shelled
1/2 cup pineapple, canned or fresh
4 tbs soy sauce
2 tps rice wine vinegar
1 tps red pepper flakes
Green onion, chopped, for garnish

Everyone has their own technique for making rice, so make it the way you like and set aside to cool. It will “fry” easier when cooled.

Finely chop the onion, garlic and ginger. Next chop the tofu, carrots, and pineapple into bite-size pieces.

In a large skillet over medium heat, heat the sesame oil. Add the tofu and cook until the outside is slightly golden. Then remove from the skillet.

If needed, add a bit more oil to the pan. Add the onion, garlic, and ginger and cook until the onions are slightly golden.

Next add the carrots, cook until tender.

Add the rice, cooked tofu, edamame, and pineapple. Mix together well.

In a small bowl, mix together the soy sauce, vinegar, and red pepper flakes. Add to the skillet and mix in well.

Press into a flat layer and let it cook for a few minutes. Break it up, press it flat again, and cook for another few minutes. Repeat until it reaches desired level of “fried.”

Sprinkle with the green onion before serving and enjoy a sweet taste of Hawaii!

Purple Sweet Potato Salad

I realized I live in Hawaii but haven’t made any Hawaiian food yet! So the next few posts will be devoted to Hawaiian dishes.

I knew sweet potatoes came in other colors, but I have only seen orange on the mainland. The first time I went to the Hilo Farmers Market, a lady was selling a bag marked “potatoes” for $2. I thought awesome! Cheap fresh little finger potatoes. When I cut into at home, I was surprised that they were purple inside.  I asked my roommate at the time, who was from Maui, and she looked at me like I was crazy. “They are sweet potatoes…You know like Thanksgiving casserole?”

Purple sweet potatoes, or ‘uala,  are a member of the morning glory family and are native to Japan.  Japanese immigrants brought them to Polynesia more than a century ago. However, it is believed that the Polynesians brought some form of sweet potatoes with them on their travels throughout the Pacific prior to the Japanese introduction. All sweet potatoes are loaded with antioxidants and have anti-inflammatory properties. They also have tons of fiber and vitamin A.

Although common to Hawaiians, they were totally strange to me. I love them now though. Not only are they my favorite color, but they are also delicious. They aren’t quite as sweet a the orange or yellow ones, and bit more starchy. They are great for fries or chips, but I love them in curries.

I decided to make a healthier version of a very common side dish in Hawaii: potato salad. Potato salad and macaroni salad are  are always part of the classic Hawaiian plate lunches. But, they are loaded with fat and calories, and I have yet to find a plate lunch place that has a vegan version. For this recipe, so no one can argue I took the Hawaiian-ness out of the salad, I used as many local products as I could. Local organic purple sweet potatoes, and carrots, plus Sweet Maui onions, and Maui Sweet Onion dressing from Rainbow of Tastes.

This recipe calls for some very specific ingredients and if you can get them, great! If not, you can always adapt the recipe to what you can get. However, I would not recommended using regular orange sweet potatoes in this recipe. Like I said, purples are starchier and sturdier, more like a real potatoes than creamy orange sweets. If you cannot get purples, just use regular potatoes.

Purple Sweet Potato Salad
8-10 small purple sweet potatoes, peeled and chop into chunks
2 medium carrots, diced
2 stalks of celery, diced
1/4 Sweet Maui Onion, diced finely
2 tbs sweet pickle relish
1/2  to 1 cup  Maui Sweet Onion by Rainbow of Tastes
Salt and pepper, to taste

Fill a pot 2/3 of the way with cold water.

They aren’t solid purple, more like marbled.

Rinse, peel, and chop the sweet potatoes into chunks. Put in the pot and bring to boil over medium-high heat.

 You can shred the carrots if you like too.

While the potatoes cook, dice the carrots, celery, and onions.


Still purple when cooked.

Once the potatoes are soft enough for a fork to be inserted with little resistance, remove from the heat and drain. You do not want them totally smushy like for mashed potatoes, but soft enough to eat and still remain in chunks. Do not rinse, it will make them smushy. Let them cool for a few minutes. The potatoes will absorb more flavor while warm, so don’t let them cool entirely before dressing.

I should have got a bigger bowl…

In a large bowl, add the potatoes, diced veggies, relish, and dressing. I recommend putting the dressing in a little at a time so you don’t over do it. It takes a minute for it to absorb. Mix it all together, seasoning with salt and pepper to taste. Try not to mash up the potatoes too much.

Cover and let it chill in the fridge for at least 2 hours.

I love the colors, and the sweet onion dressing is the perfect compliment to the sweet potatoes.